This article walks you through the steps for how to use Pick to Cart fulfillment in both the Infoplus desktop and mobile app to fulfill orders.
The Pick to Cart fulfillment option increases the accuracy of the Pick and Pack portions of fulfillment. This feature is used when picking items and placing them directly onto a mobile cart.
- Use a scanner, rather than counting, to ensure proper order fulfillment.
- Capture carton contents on the floor while the work is being performed.
Here's How it Works:
- Run Fulfillment using the "Pick to Cart - by Order" or "Pick to Cart - by SKU" Picking Rule on the orders which are expected to fit onto a mobile cart. This creates a Fulfillment Process. (See Run Fulfillment for details on fulfilling orders.)
- If using Pick to Cart - by Order, you can use the Batch Size Max field to ensure that you will not have more orders in a process than you have positions on your picking cart. For example, if your cart has 24 positions, and you're processing 45 orders - if you set a Batch Sizes Max to 24, then two fulfillment processes will be created (the first with 24 orders, the second with the balance of 21 orders).
- If using Pick to Cart - by SKU, you can use two different fields to control how your pick work is organized, to allow multiple pickers to work a process at the asme time, or to deal with processes that may have more SKUs than your pick carts can hold:
- Pick Batch Group - if a value is selected in this field, then a separate Work Batch will be created for each different value in that field, as it applies to all picks in the process. For example, to send a different picker to bulk storage locations than to down forward locations, choosing Location Zone in this field would create 2 Work Batches, which could be picked at the same time, by different pickers.
- Max SKUs per Batch - a value in this field will control the maximum number of cart locations in each work batch, and, if the process requires more than this number of cart locations, additional work batches will be created for the additional picks. For example, if a pick cart only contains 12 bins, but a process needs 30 bins, 3 work batches would be created.
- Infoplus will create a Work Batch for all orders in that Fulfillment Process and will also produce LPNs for each order or item in the process, depending on if picking by order or by SKU. An LPN is a License Plate Number displayed as a barcode that represents an order or item. These LPNs will correspond to positions on the cart.
- After rolling a cart to the first warehouse location containing an item for an order in the Work Batch, you will begin performing the pick work in Infoplus. Scan a position on the cart for each order and then scan and place items into the proper positions.
- Move the cart to the Packing Station and use the Pack Station Warehouse App to pack your cartons.
This article covers how to Perform Pick to Cart Work and use the Packing Station Warehouse App.
Notes and Requirements:
- The Pick to Cart feature requires the use of technology with scanning capabilities.
- This feature is intended for use when automated cartonization is NOT being used.
- All items to be picked using this feature must have a scannable code associated with them in Infoplus. See Create/Edit Items for information on an item's Barcode field.
To deal with items that may not have a physical barcode on them, we recommend that a sheet of barcodes for these items be attached to the cart or otherwise be made available (similar to a checkout lane at a hardware store with a sheet of barcodes for bulk items).
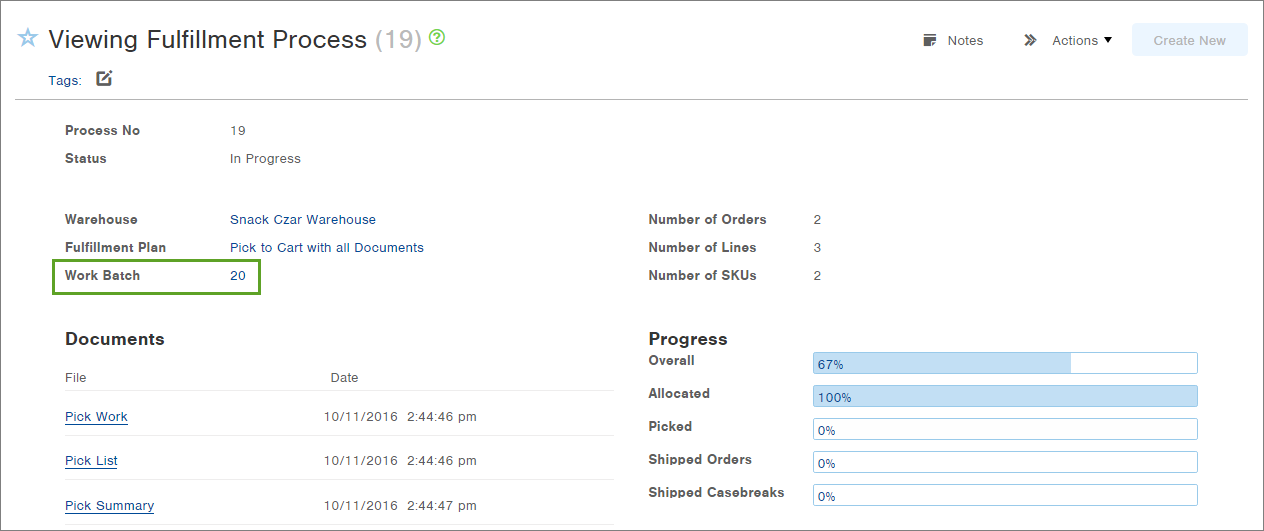
Here is an example of the Fulfillment Process record showing the associated Work Batch. You will see this Work Batch ID when performing the Pick to Cart work.
Perform Pick to Cart Work
The upcoming steps will help ensure that you pick the correct products for orders in the Work Batch, from the correct locations, and place them into positions on a mobile cart representing the correct orders.
- On your scanner, log into Infoplus. The Infoplus Dashboard appears.

-
Select the Work App.
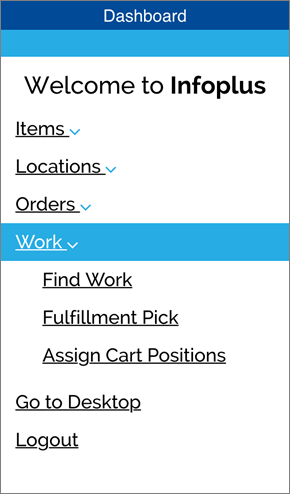
-
From the Work drop-down menu, select Find Work. The Find Work screen opens showing all available work.
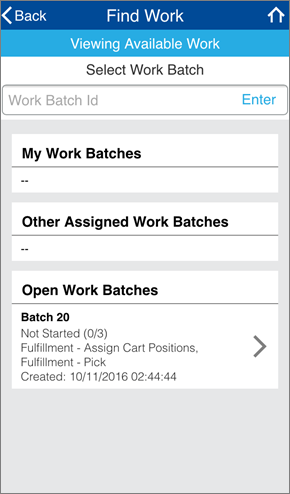
My Work Batches lists work you started but did not complete.
Other Assigned Work Batches lists work in progress by others. Anyone can take over this work.
Open Work Batches lists work batches that need to be worked. -
Tap on the work batch you will be performing. The Work Batch will open.
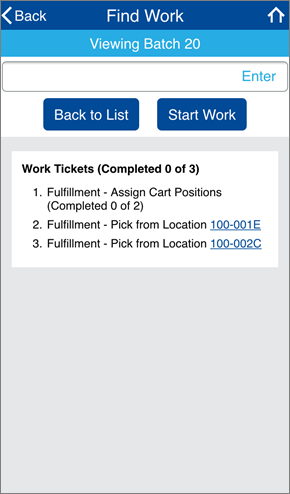
In the above example, the Pick to Cart work consists of three actions: assigning cart positions and then picking items from two different warehouse locations. The amount of work in each Work Batch depends on the number of orders in the batch, the number of items in each order, and the scanning requirements of the fulfillment process's Pick Scan Scheme (e.g., to scan the location AND the item). -
If you want to work the batch you selected, tap Start Work. (If you do not want to work the batch, tap Back to List). After tapping Start Work, you will be prompted with actions to take to perform the work. The current action will be highlighted in the list.
-
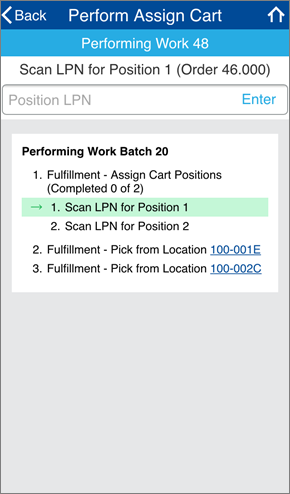
The first action will be to scan the LPN barcode from the position on the cart where you will be placing the first order's products (an LPN is a License Plate Number for the position).
NOTE: Some carts use totes to represent positions on the cart, but it is not a requirement. You could simply have a barcode label on an area of the cart representing a position.
NOTE: In all mobile screens, you can also type into fields at the top of the window. You will need to tap Enter after typing. -
If the scan was successful, green text will appear at the top and you will be prompted for the next action. The completed action will display with a line through it and the characters from the barcode you scanned will appear. If you scanned the wrong barcode, tap Delete next to the barcode and try again.
If the scan was unsuccessful, a red error will display at the top and you will need to rescan.
If the Work Batch contains multiple orders, you will be prompted to scan additional cart positions. This will create a connection between each order in the Work Batch and the cart position where items for that order will be placed.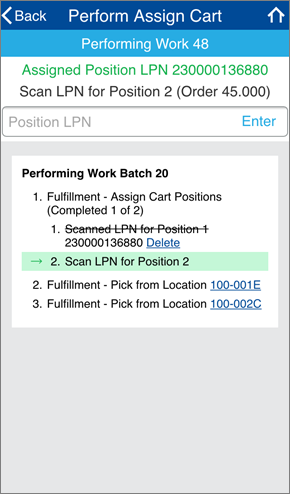
-
Once you have assigned all cart positions, you will see a Continue Work button.
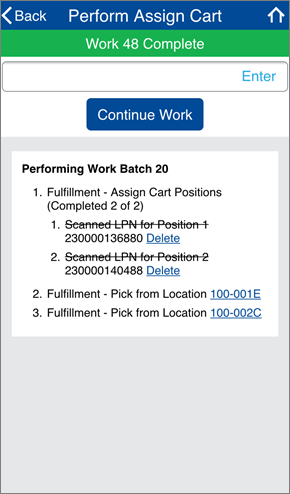
- Click Continue Work. The next action will be highlighted.
NOTE: Upcoming actions depend upon the number of items and the Pick Scan Scheme that was selected during fulfillment.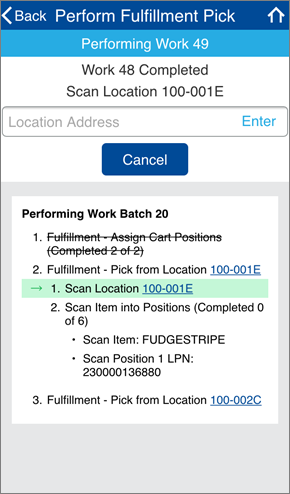
- If you are prompted to scan the Location, scan the Location's barcode for the first item you are picking. Infoplus will identify the item in that location that matches the item on the order. The next action will be highlighted.
NOTE: Tapping the Location (e.g., 100-001E) will display the Location Inquiry screen with details about the location. Use the Back button to return to the pick work.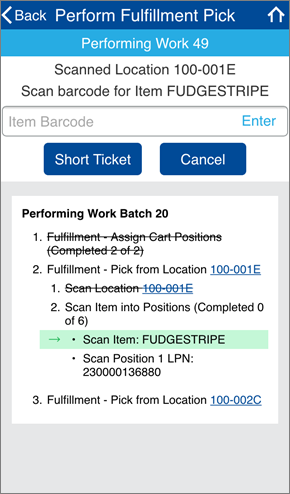
- If you are prompted to scan the Item, scan the Item's barcode. The next action will be highlighted.
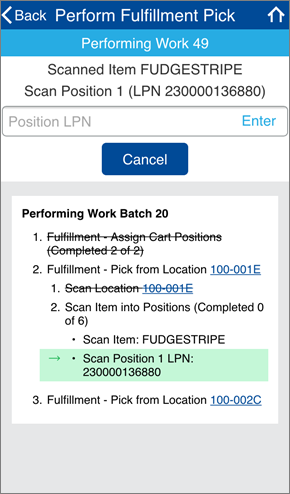
- Scan the barcode for the cart position where this item will go. This will create a connection between the cart's position and the order. Infoplus will ensure items from other orders do not get placed into the same position.
-
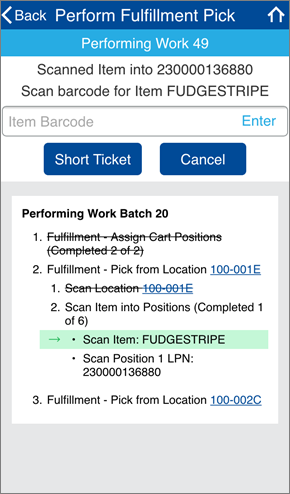
In the above example, there are 6 FUDGESTRIPE items in this work batch (indicated by the "Completed 1 of 6" message next to the action). You will continue to get prompted for FUDGSTRIPE items and cart positions to complete picking of all 6 FUDGESTRIPE items. Infoplus will ensure you place the items into different positions on the cart if they are for different orders. Then you will move on to actions to scan other locations and other items to complete all orders in the Work Batch.
Once you have performed all of the necessary actions in the Work Batch, the Work Batch will be complete.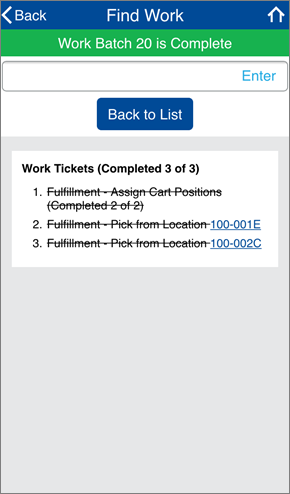
You should now have a cart full of items for orders in the completed Work Batch.
Pack Orders from the Cart into Cartons Pack Station
- From the Infoplus Dashboard on a computer, click the Mobile Floor Apps tab. The Mobile Floor Apps appear.
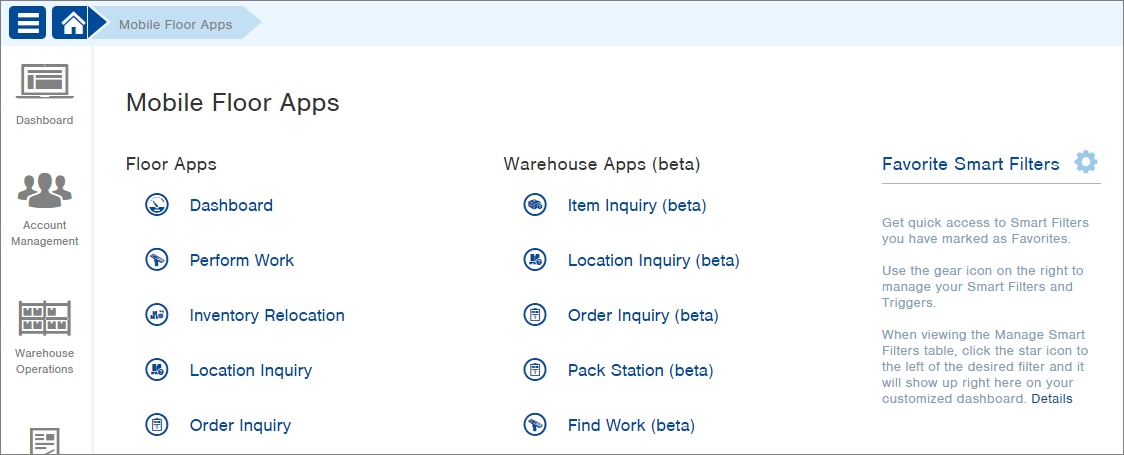
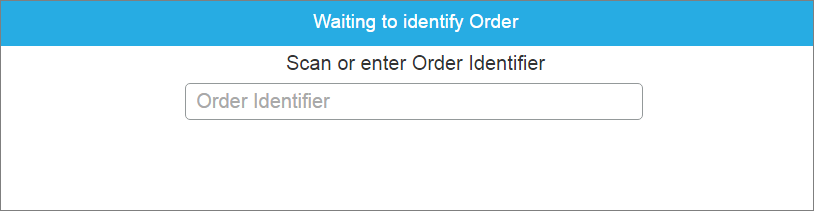
- Click on the Pack Station Warehouse App. You will be prompted to scan or enter an Order Identifier.
-
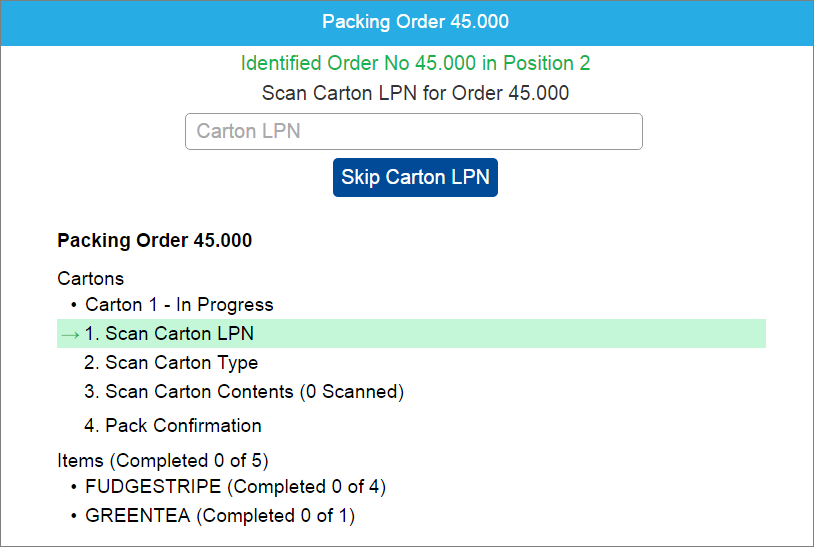
Scan the Order number or LPN associated with the order for the Order you are packing (e.g., scan the order number from a Packing Slip) or type in the information and press Enter. You will be prompted to build the first Carton.
-
If you want to track the carton, scan the Carton LPN. Otherwise click Skip Carton LPN. The Scan Carton Type ID screen will appear.
TIPS:
- If you want to track the carton, you might consider having a roll of stickers with LPNs that you attach to the carton at the packing station.
- If you plan to skip any of the steps in this process, you may want to create barcodes to represent the "Skip" steps so that you do not have to use the computer keyboard, and can use the scanner for the entire process. See Use Barcodes for Infoplus Actions.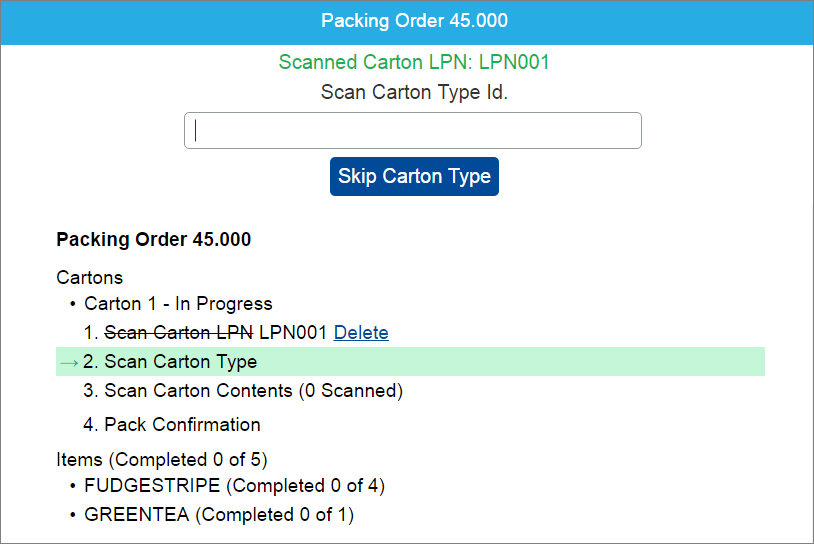
-
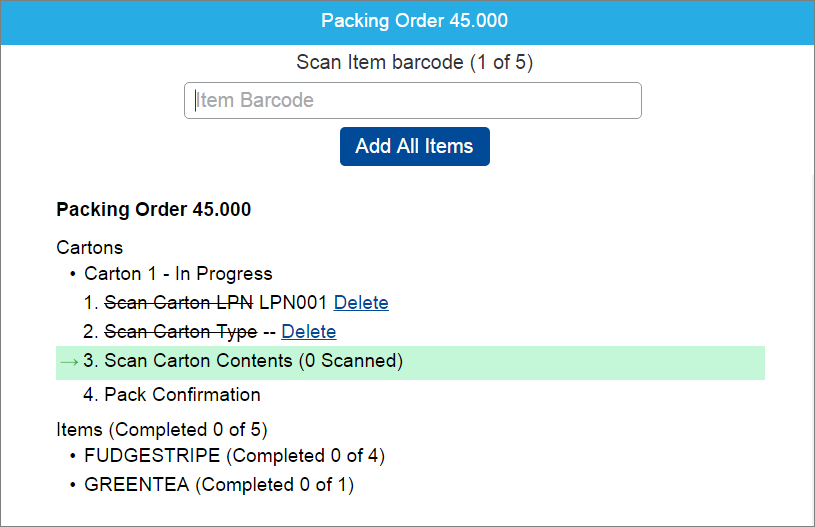
If you want to track the Carton Type, scan the Carton Type ID. Otherwise, click Skip Carton Type (or scan the associated barcode). The Scan Item Barcode screen will appear.

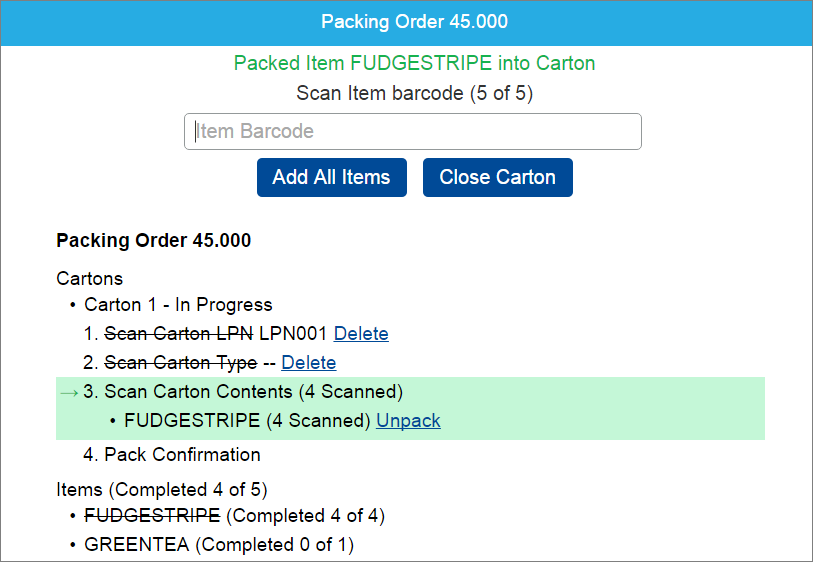
-
Scan the barcode for the each Item you are placing into the carton.
NOTE: If you know all items for the order will fit into one carton, or you have chosen to not do a secondary scan of the items into the shipping carton (since you already scanned during pick), click Add All Items (or scan the associated barcode). You will then not need to scan each item. -
If all items for an order will not fit into one carton, after you have filled a carton, click Close Carton (or scan the associated barcode). Here's a screenshot showing the Close Carton button:
-
After all items for a carton are packed, click Close Carton. If you have AutoPrint turned on, documents for the Carton will be sent to a printer.
NOTE: You can view and/or reprint documents by clicking the View or Reprint links.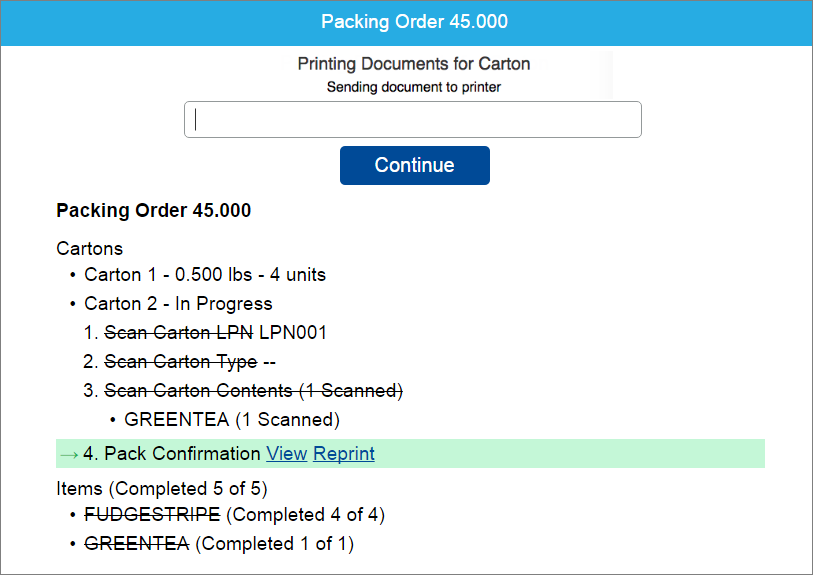
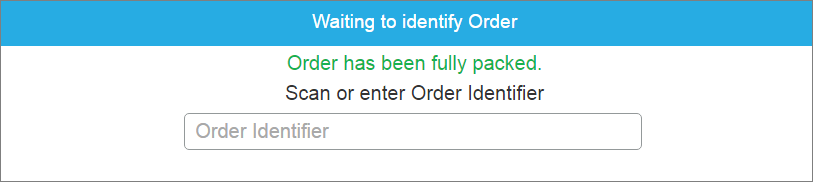
-
Click Continue. Once an order is complete, the screen will indicate that the order has been fully packed and will be ready to pack another order.
Carton Type IDSkip Carton TypeScan Item Barcode: