Learn how kitting works in Infoplus and how to set up both pre-assembled kits and kits on demand.
A Kit is a group of products that are to be shipped together. A Kit record in Infoplus lists all SKUs that make up the Kit and indicates how the Kit is to be assembled when an order for the Kit is fulfilled.
Here's an example: You sell a Beginner's Toolkit which is to be assembled when an order is fulfilled. The Kit contains a Hammer, two Screw Drivers, and a Wrench. Each tool has its own SKU. Create a Kit to indicate that when the Beginner Toolkit (the Kit SKU or top level SKU) is ordered, include the Hammer, two Screw Drivers, and a Wrench (the Component SKUs) in the shipping carton.
The Kit SKU UOM as 'Kit' (which represents the top level SKU that can be ordered) and the Component SKUs UOM as 'Each' (which represent the items in the Kit) must be created and active for the Kit you want to create. See Create/Edit Items for more information.
There are two types of Kits in Infoplus:
- Standard Kits: These are pre-assembled kits. Internal operations will assemble these kits to create the finished product which lives on your warehouse floor. Standard Kits are often created in Infoplus to provide a Bill of Materials (a list of all kit components). Standard Kits will utilize the Jobs module, not the Kit table. Here is a link where you can learn more about Jobs: Create a Job
- KODs (Kits On Demand): KODs are kits that are pulled together at the point of fulfilling orders. During fulfillment, pick work for all components will be created and the Order Assembly Guide (if generated) will show the components that make up the kit. See Kit on Demand (KOD) for more information. There are two types of KODs:
- Unassembled: Items in the kit are simply to be put into the same shipping carton during fulfillment (e.g. just put the hammer, two screwdrivers, and wrench into the same shipping carton).
- Assembled: Items in the kit are to be assembled together as a unit prior to placing in a carton during fulfillment (e.g. put the hammer, two screwdrivers, and wrench into its own box and then place it into the shipping carton).
How to Create a Kit
- Access the Kit table. Two ways:
- From the Dashboard: Click the Warehouse Operations tab, click the Item Management App, then click the Kit table.
- From the Quick Actions shortcut: Press a dot (period) on your keyboard, then select Kit from the list of Quick Actions.
- Click the Create New button in the top right. The Creating New Kit screen appears.
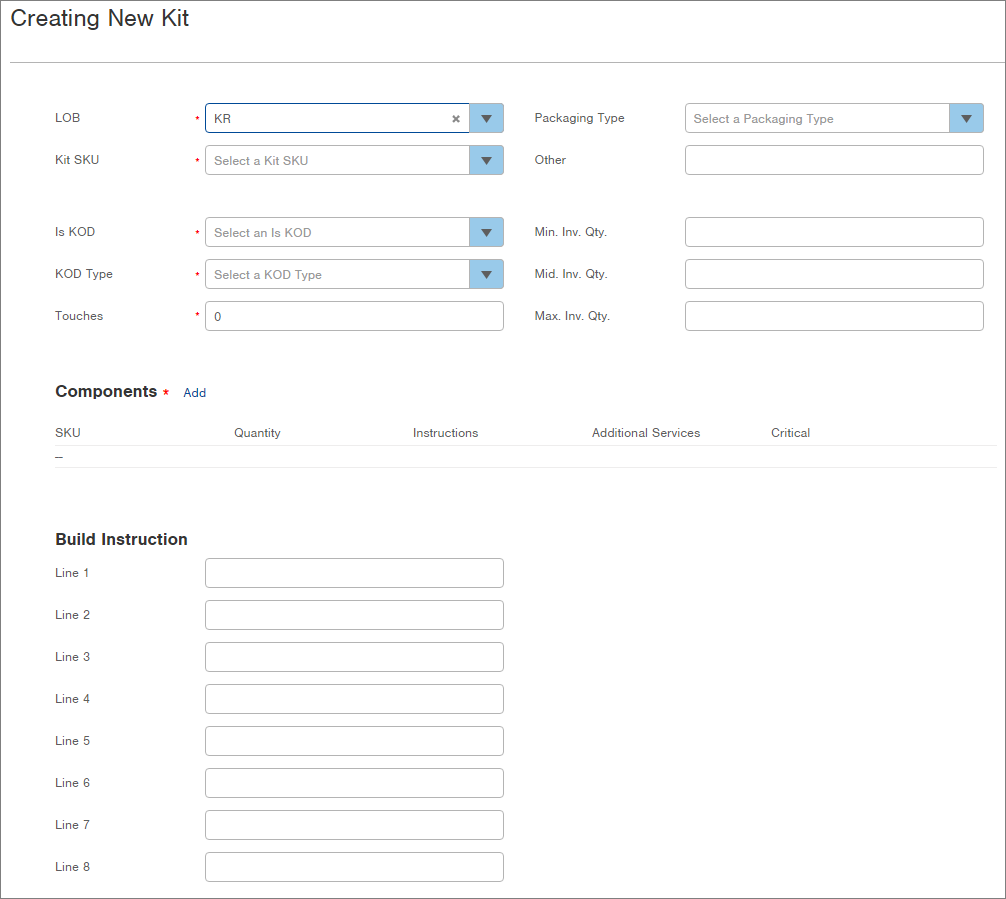
- In the LOB field, select the Line of Business that contains this Kit.
- In the Kit SKU field, select the top-level SKU for the Kit. This is often referred to the Kit Header SKU.
- If you are creating a Standard Kit (to use as a Bill of Materials) these pre-assembled Kits must be created on the Job table, if created on the Kit table, an error will be encountered (There was an unknown error saving this Kit. Error modifying Kit).
IF you are creating a Kit On-Demand (to pull component SKUs into an order for the Kit SKU), select Yes in the Is KOD field. - In the Touches field, enter the number of assembly points there are to build a single kit. This is for informational purposes only.
- Optional: In the Packaging Type field, select if the Kit is packaged in an Envelope, Box, Folder, Binder, or Other. If you select Other, fill in the Other field with this Kit's Packaging Type.
- In the Components section, click the Add link to add the components that make up this kit. The Add Component screen appears.
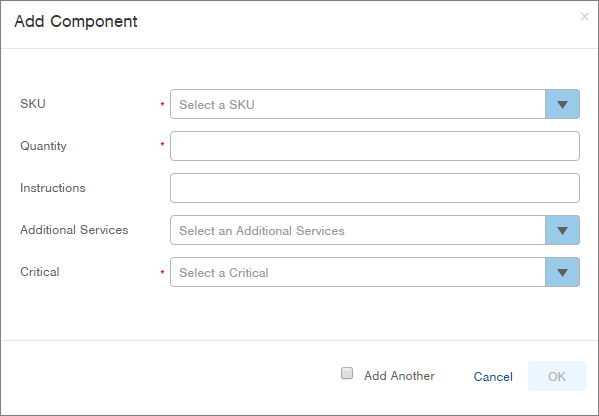
- Select a SKU that is to be part of this Kit.
- Type the Quantity of the SKU to be included in the Kit.
- If there are special instructions regarding the SKU as part of this Kit, enter them into the Instructions field.
- If there are Additional Services (e.g. Staple, Fold, Sticker) to be applied to this SKU when included in a Kit, select the service.
- In the Critical field, describe how critical the component is to the kit:
- Not required: This Kit can be built without this component.
- May build without, but Refurbish: This Kit can be built without this component, but when the SKU is received, look at orders of this Kit and add the missing component.
- May Not Build W/O: This Component is required in the Kit. - Click OK to add the component.
NOTE: If you want to immediately add another component, click the Add Another checkbox before clicking OK. - Continue to add components as needed.
- In the Build Instructions section, type any instructions necessary for building the Kit.
- Once the Kit is complete, click Save.
When an order for a Kit on Demand SKU is fulfilled, pick work will be created to pick all Component SKUs and the Order Assembly Guide (if generated) will indicate the Components that make up the Kit.
When an order for a Standard Kit is fulfilled since the Kit is preassembled, pick work to pick the Kit SKU will be created. No kit assembly will be required.
Kits on Packing Slips; How to Suppress Kit Headers
Occasionally it may be useful to hide or suppress the Kit header so that it does not appear on a packing slip. Such a use case could be warehouse packers unintentionally packing duplicate items into an order due to the Kit header and kit components being listed on the packing list. Infoplus does not support the suppression of kit components on a packing slip, however, the suppression of the kit header is supported.
To hide or suppress your kit header, navigate to the External Shipping Station table and select the system that you are using (ex. ShipStation). Edit the record so that "explode all kit contents" is marked as false, which will mean the kit components will no longer appear on the packing slip.
