Step-by-step instructions for how to add and set up billing codes in Infoplus for billing clients.
A Billing Code is used to track services performed for billing purposes. For example, if you bill a fee for every 40-foot container that is unloaded, create a Billing Code in Infoplus to track the quantity of 40-foot containers that are unloaded. The Billing Department can view/export Billing Code records as needed.
You can create Billing Codes through the Desktop App (instructions below) or through the Billing Code Mobile Floor App which allows use of a scanner (see the Billing Code Mobile Floor App Video for instructions).
Create a Billing Code through the "Billing Code" Table
NOTE: If you are using the Billing Code Mobile Floor App, see the Billing Code Mobile Floor App Video.
- Access the "Billing Code" table. Two ways:
- From the Dashboard: Click the “Warehouse Operations” tab, click the “Accounting” App, then click the “Billing Code” Table.
- From the Quick Actions shortcut: Press a dot (period) on your keyboard, then select “Billing Code” Table from the list of Quick Actions.
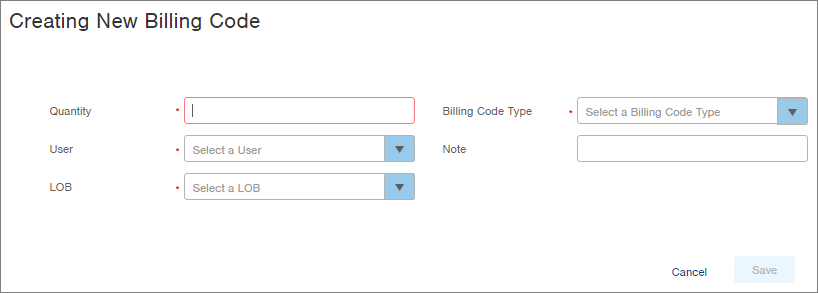
- Click the Create New button in the top right. The "Creating New Billing Code" screen appears.
-
Enter the Quantity of work performed. For example, if you unloaded three 40-foot containers, type a 3.
-
In the User field, select the name of the person who performed the work. The person must be an Infoplus User.
-
In the LOB field, select the Line of Business for which the work was performed.
-
Select the Billing Code Type that matches the work performed. For example, if you unloaded three 40-foot containers, a Billing Code Type similar to "40-Foot Container" should be a selection in the drop-down menu. See Create Billing Code Types for more information.
-
Optionally, enter a Note providing more information about this Billing Code.
-
Click Save. The record will be saved. It is now visible in the "Billing Code" table.
