Quickly and easily make multiple quick adjustments at one time by using the Bulk Load functionality in Infoplus.
Create multiple Quick Adjustments at once with a Bulk Load. You can Bulk Load from a .csv or Excel file.
- To learn more about bulk loading in Infoplus, see our step-by-step guide to Bulk Loading.
A list of the required fields for upload, as well as a downloadable template, are available after you select the Bulk Load action in the Quick Adjustment table.
After loading the records, you will need to Execute the Quick Adjustments.
Important Note: Only bulk load in batches of 5,000 or less except for Orders. You can only bulk upload 1,000 Orders at one time.
- Best practice is to perform large bulk edits and/or loads outside of peak business hours
Bulk Load Quick Adjustments
- Access the "Quick Adjustment" table. Two methods:
- From the Dashboard: Click the “Warehouse Operations” tab, click the “Inventory Management” App, then click the “Quick Adjustment” Table.
- From the Quick Actions shortcut: Press a dot (period) on your keyboard, then select “Quick Adjustment” from the list of Quick Actions -
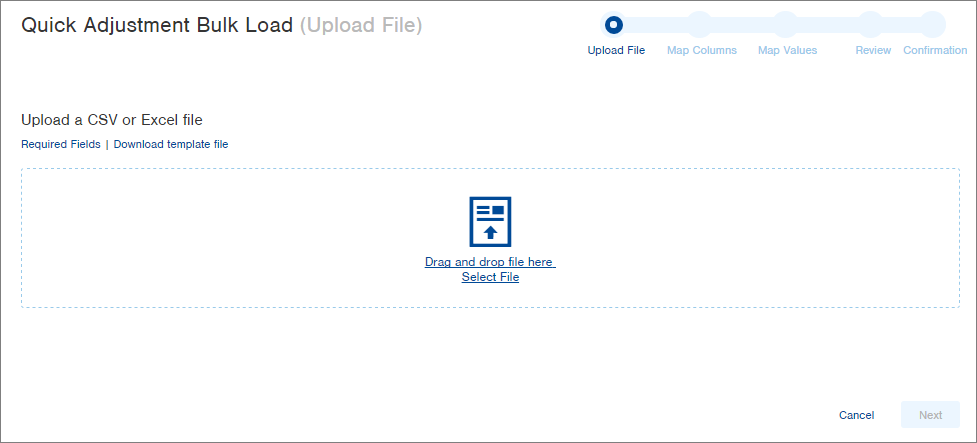
Click the Actions button and select Bulk Load. The Quick Adjustment Bulk Load window appears. Steps in the process appear in the top right with the Upload File step selected.
NOTE: When working through the Bulk Load steps, clicking the browser's Back button will take you out of the Bulk Load and return you to the table. You cannot use the back button to move back a step in the process. -
Either drag and drop the file to be uploaded onto the icon, or click the Select File link to select a file on your computer.
NOTE: To see a list of the Required Fields for bulk load, click the Required Fields link. To download a template containing a column for all required fields, click the Download template file link. -
After selecting the file, click Next. The Map Columns step in the process appears.

- Work through each field, working from left to right, to consider your mapping options and make the proper selections.
If you saved a profile (which also saves all selections in the "Map Values" screen), click the Saved Profiles drop-down menu and select the Saved Profile.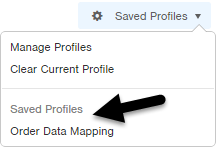
NOTE: If you have not saved a profile and would like to save the mapping you are currently developing, you will have a chance to do so during the Review step.DETAILS ABOUT EACH COLUMN IN THE SCREENSHOT ABOVE:
- These are the fields available in Infoplus for the particular Table you are uploading data into.
"Destination Field in Infoplus" (First column)
"Column From Your File" (Second column)
- Select the column from your source file that should be mapped to the Infoplus field on its left. If a field in your source file has a similar name as an Infoplus field, it will automatically be selected for you. You can override any automatic selections if necessary. Asterisks (*) indicate required fields for the upload.
"Default Value" (Third column)
- If your source file does not contain a column of information that needs to be uploaded, the column is blank, or you want to override existing values in your source file, you can select a Default Value for the column. For example, if the Adjustment Code is "Customer Audit" for every record you are uploading, select a Default Value from the list of Infoplus values.
NOTE: You cannot select to map the column AND select a Default Value. You need to do one or the other. To “unmap” a column, click the X next to the field name in the “Column From Your File” section.
"Map Values" (Fourth column containing checkboxes)
- The Map Values checkbox allows you to connect values from your source file to values in Infoplus. For example, perhaps you display the Adjustment Code of "Customer Audit" as simply "audit" in your data source. Infoplus won't recognize that Adjustment Code, so it will not be able to upload that information. To avoid having to edit your source file to match what Infoplus wants, you can connect your value to the Infoplus value. After clicking Next, you will be presented with a screen to map each record where you selected the Map Values checkbox. - After making your mapping selections, click Next. If you had selected any of the Map Values checkboxes, a Map Values screen will appear for each checkbox selected. From the drop-down menu(s), select the appropriate Infoplus value(s) for each source file value. Here’s an example of the Map Values screen for the Adjustment Code field (destination value mapping already applied):
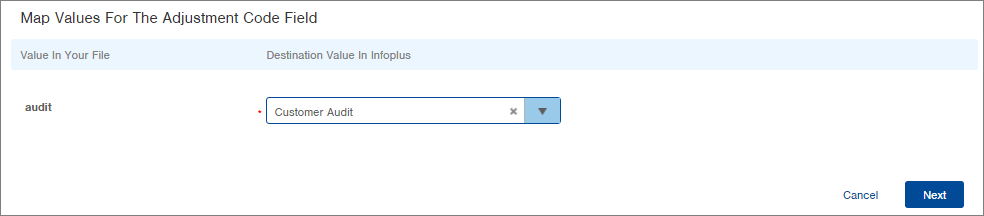
In the above example, the source file contains an Adjustment Code of "audit". This entry does not match the value options in Infoplus, so we have mapped this value to an Infoplus value. When Infoplus encounters a value of "audit", it will know to use "Customer Audit" as the value.
NOTE: You can map many value variations in a field (i.e., audit, client audit, etc.). 100 is the limit. - After making any Map Values selections (if required), click Next. The Review screen will appear.
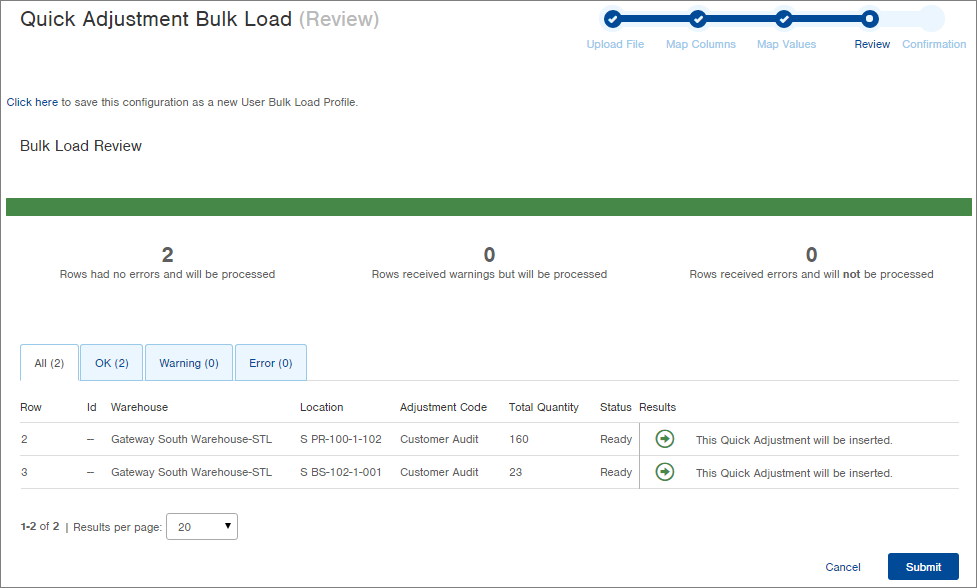
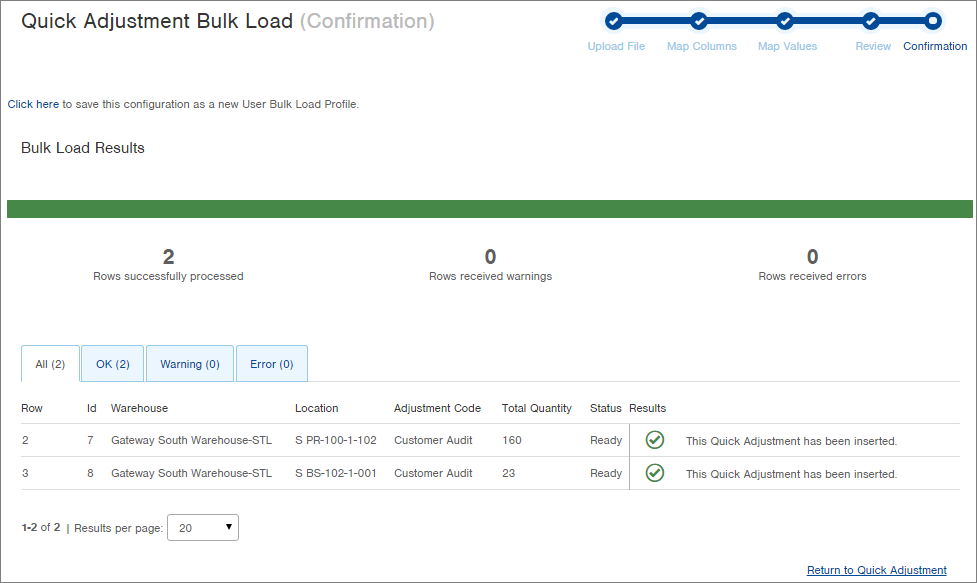
The “All” tab displays the results of each record in your data source. You can narrow your view of results by clicking on the other tabs (OK, Warning and Error). -
If you would like to save your mapping selections to be used on a future mapping of records to this Table, click the Click Here link at the top of the window.

The Save As screen appears:
Enter a name for the Profile (i.e., Quick Adjustments Upload) and click Save. The next time you perform an upload and you want to use similar mapping, you can select the Profile during the Map Columns step of the process. NOTE: You can make mapping edits after selecting the profile, and you will have an opportunity to save your changes in the Review screen. - To perform the upload, click Submit. The Confirmation screen will appear with the final results.

- The upload is complete. The Quick Adjustment records have been created, but the adjustments have not yet been executed, meaning the location will not yet reflect the adjusted inventory. See Execute Quick Adjustments for detailed instructions.