You can ship orders out of Infoplus as LTL, FTL, Will Call, Local Courier, etc. These are the steps to ship a non-parcel order in Infoplus.
Infoplus lets you manage Non-Parcel Orders, an order that is to be shipped using a method other than a parcel carrier, and you can manually add tracking numbers to these orders. It's just one of the many ways Infoplus supports all of your shipping needs.
NOTE: Parcel Orders are auto-generated from the parcel carrier that cannot be edited.
- Examples of parcel carriers include UPS, FedEx, DHL, USPS, etc. Use the standard process to ship a parcel order when using parcel carriers.
- Examples of non-parcel carriers include shipping LTL (Less than truck load), TL (a full truck load), Will Call (where recipient comes to warehouse to receive the item), local courier, etc. To ship non-parcel orders, use this Ship Non-Parcel Order process.
Ship a Non-Parcel Order
- Access the Order table. Two methods:
- From the Dashboard: Click the “Warehouse Operations” tab, click the “Fulfillment” App, then click the “Order” Table.
- From the Quick Actions shortcut: Press a dot (period) on your keyboard, then select “Order” from the list of Quick Actions.
NOTE: You can also access this process directly by pressing the dot (.) on your keyboard and selecting "Ship Non-Parcel Order" from the list of Quick Actions. You will be taken to the "Order" table to select the order. A Next button will display to continue through the process starting from Step 4 below. - Click the checkbox next to each non-parcel order that you want to ship. You can select all records that are displayed by clicking the checkbox in the upper left corner. If the list of records exceeds the page limit (i.e., 20 records), a message will appear at the top indicating that you have only selected the records on this page and a link allows you to select all records.
NOTE: Be sure to select orders requiring the same shipping details (i.e., number of cartons, weight, carrier, etc.) because those entries will be the same for all orders selected.
- Click the Actions button and select Ship Non-Parcel Order. Infoplus validates that the selected order(s) can be shipped. If valid, the Ship Non-Parcel Orders process begins with the Setup step selected.
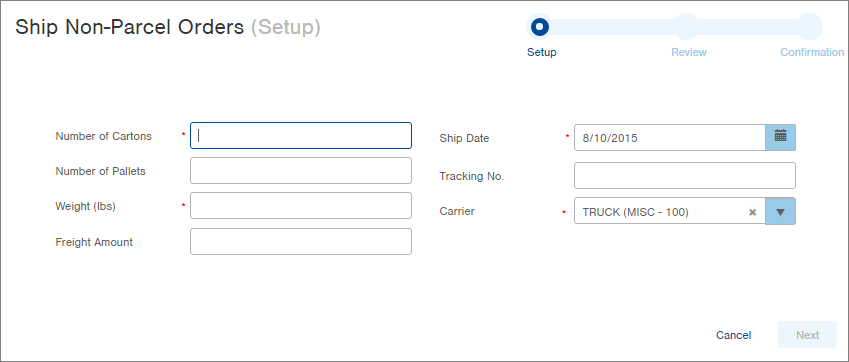
NOTE: The above screenshot shows a Carrier selection. This field will default to the carrier of the Orders you selected.
If the order(s) selected were not valid (i.e., because the order was not in a status of Processed) a Review screen will appear (prior to the above screen) indicating the error. Correct the error or select a different order and begin the process over again. Here's an example of a Review screen indicating an error: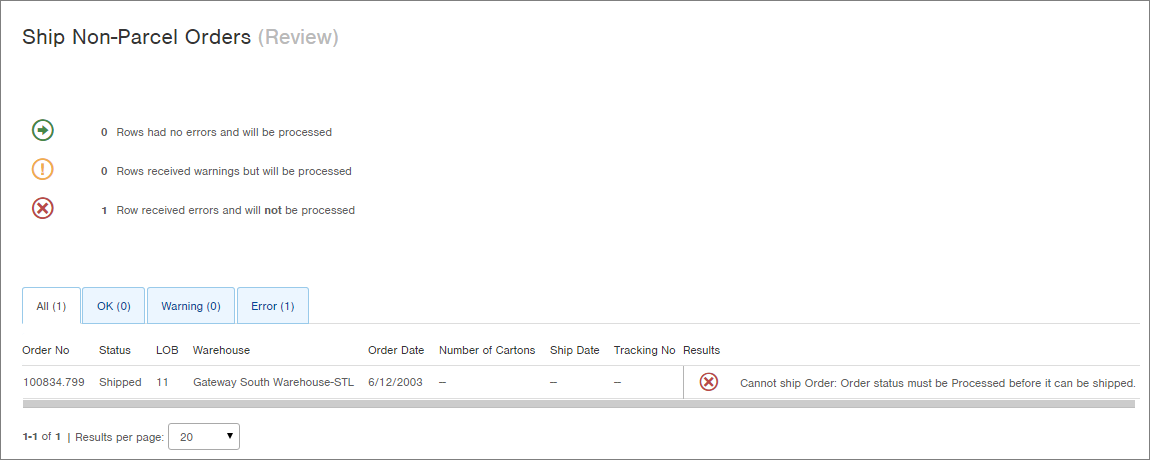
-
Once the records are validated, and the Setup step appears, complete the fields in the Setup window. Your selections in the Setup window will be applied to each order selected. An asterisk (*) indicates a required field.
- Enter the Number of Cartons to be used for each order.
- Enter the Number of Pallets to be used for each order, if applicable.
- Enter the Weight of each order.
- Enter a Freight Amount, if applicable.
- Modify the Ship Date, if needed.
- Enter a Tracking Number, if applicable (i.e., to indicate all orders were going on the same truck shipment).
- Select a Carrier. The Carrier field will default to the Carrier of the order(s) if the same Carrier is set on all the orders selected. You can override the Carrier as needed. -
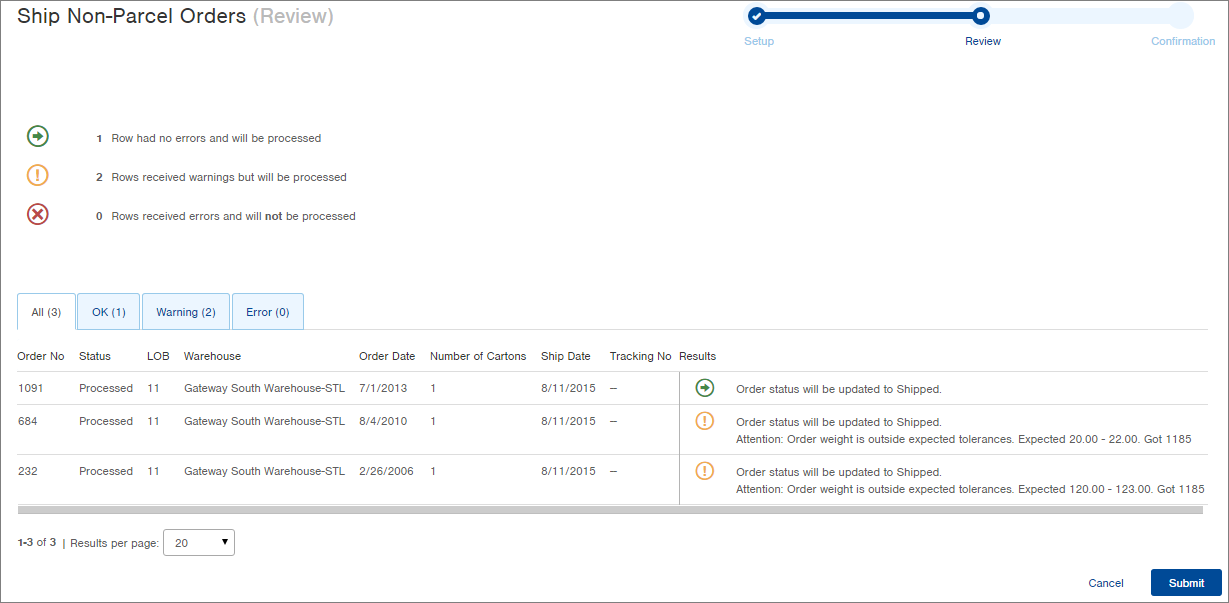
Click Next. The Review step in the process appears.
-
Review the planned Results. The above screenshot indicates that all Order statuses will be updated to Shipped. There were two warnings indicating that the weight entered did not match the expected weight. You can continue through the process, or cancel if you have selected an order in error.
-
After confirming the results, click Submit. The Confirmation step in the process appears.
-
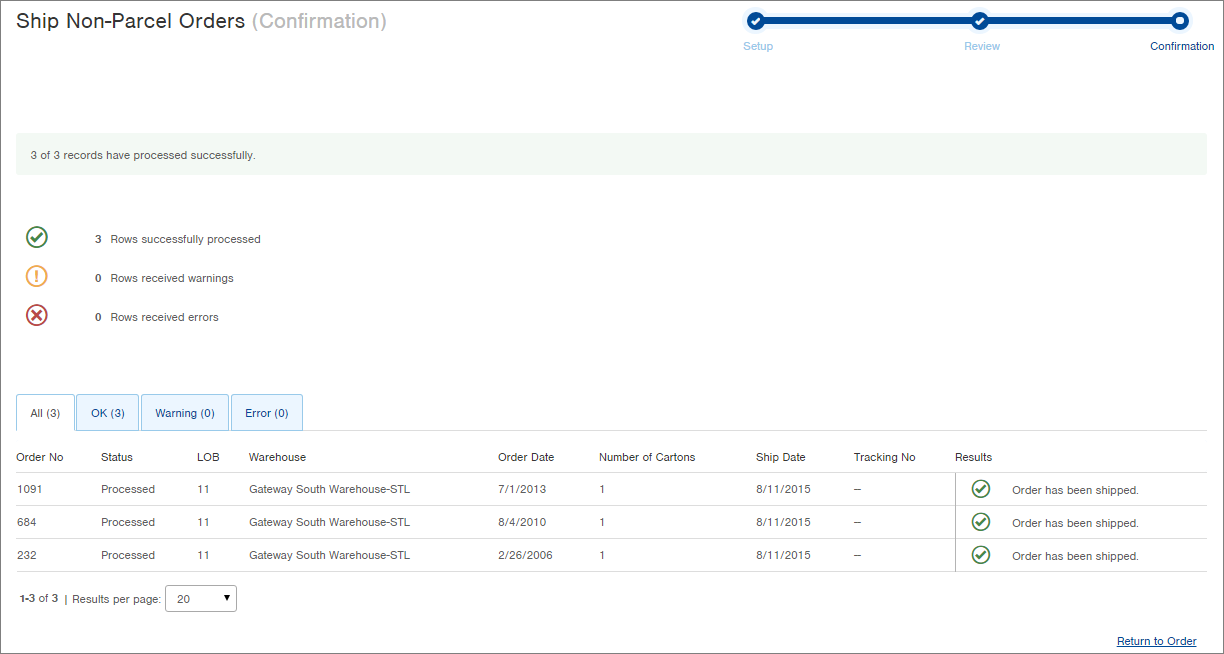
Review the actual Results. All selected orders will now show a status of "Shipped" and shipping details will have been added to the Order record. You can return to the Order table or elsewhere in Infoplus.
