Packing slips are required documents for every order that is shipped out of Infoplus.
A Packing Slip is a shipping document that accompanies delivery packages. These Packing Slips are printed for an Order based on a Packing Slip Template. There are predefined Packing Slip Templates available in Infoplus, but you can also create your own.
- Use predefined Templates in Infoplus or create your own.
- Create Packing Slips during fulfillment (See Run Fulfillment) or use the Warehouse Documents report (See Create/Print Warehouse Documents).
- Use a Trigger to automatically assign a template to all orders that meet specified smart filter criteria. See Automatically Assign a Packing Slip Template.
Please see the attached file at the bottom of the page for a packing slip template guide PDF that visually shows where the fields in the UI are mapped to.
Information on a Packing Slip comes from the Order Record (i.e. Shipping Address and SKU information), but a Packing Slip Template specifies the layout of the packing slip and determines which information from the Order record to display. The template also allows you to enter common messaging to display on a Packing List (i.e., "Satisfaction is Guaranteed").
This support article describes how to:
- Create a Packing Slip Template
- Add Images to Packing Slip Templates
- Preview Packing Slip Templates
- Duplicate Packing Slip Templates
Create a Packing Slip Template (8.5x11)
Important Information:
Note that the label-sized packing slip layouts (e.g., 4x6 or 4x8) do not support as many of these fields as the full-page layouts. Fields that are not supported by the selected layout will be disabled when editing the packing slip template.
Additionally, 4x6 packing slips only support up to (4) SKUs at this time and cannot be edited to accommodate more SKUs or additional fields. See the 4x6 and 4x8 Packing Slips below.
- Access the “Packing Slip Template” table. Two ways:
From the Dashboard: Click the “Warehouse Operations” tab, click the “Fulfillment Setup” App, then click the “Packing Slip Template” Table.
From the Quick Actions shortcut: Press a dot (period) on your keyboard, then select “Packing Slip Template” from the list of Quick Actions. - Click the Create New button in the top right. The Creating New Packing Slip Template screen appears.
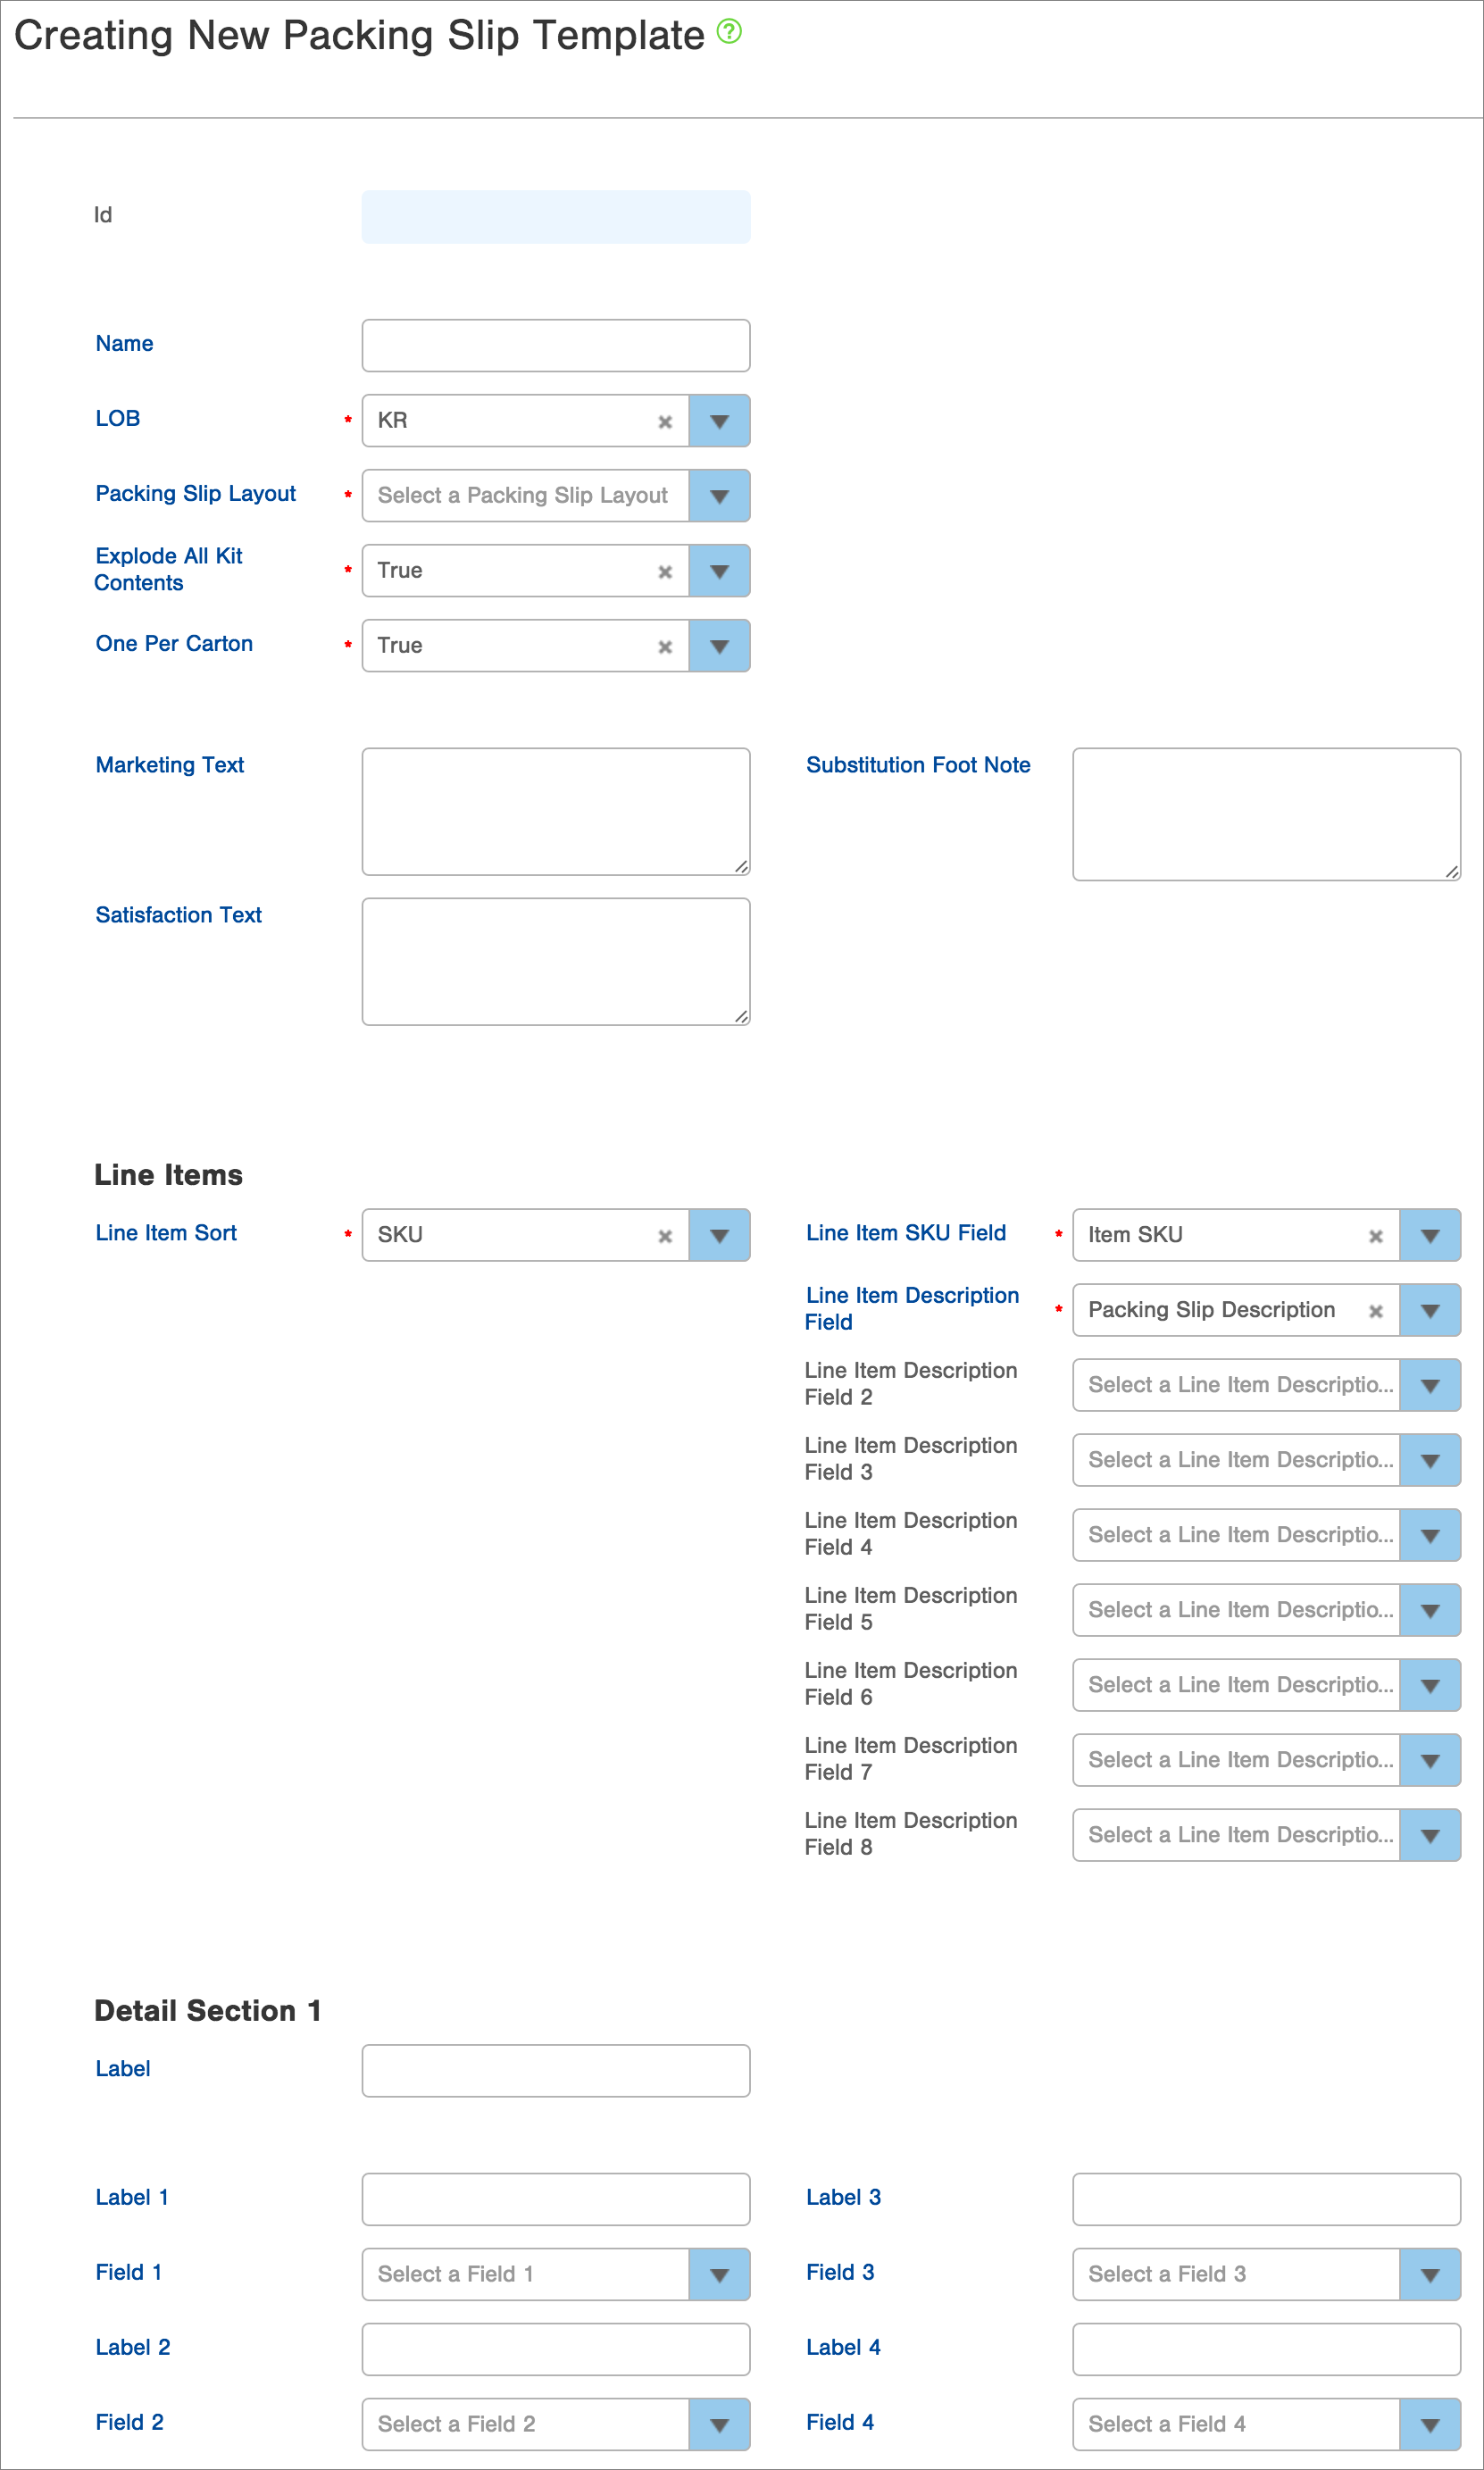
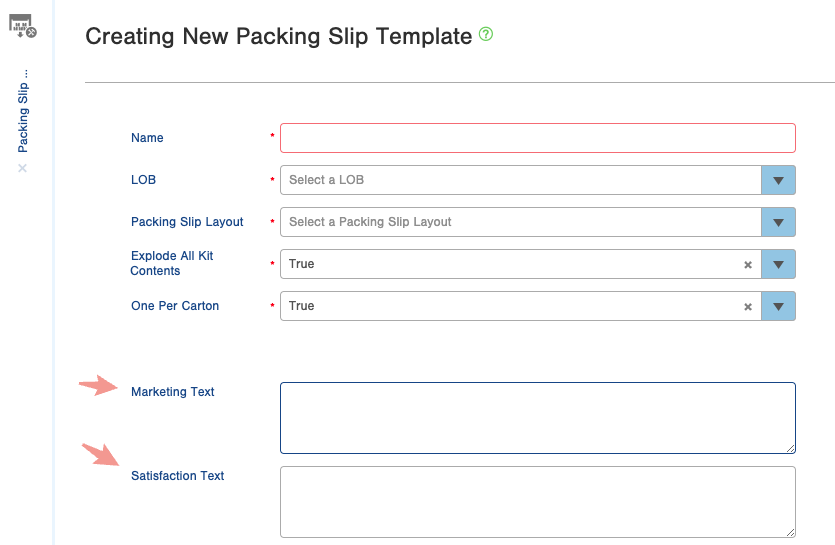
- Enter a Name for the Packing Slip Template.
- Select the Line of Business (LOB) where this Packing Slip will be used.
- Select a Packing Slip Layout from the drop-down menu (e.g., Standard Packing Slip 8.5 x 11, Standard Packing Slip 4x8). This layout dictates the placement of content on the packing slip, as well as the page size produced when this template is rendered.
- In the Explode All Kit Contents fields, select True to display all SKUs in the kit or False to display one line for the kit.
- If an order will ship in multiple cartons, select True to print one Packing Slip per carton (will only contain the items in that carton), or False to print one Packing Slip showing items for all cartons that make up the order.
- Enter text into the appropriate Text fields. Remember, you are typing text into the Packing Slip Template, so it will appear for all orders using this template.
- Marketing Text: Text typed here will display where specified in a Message Section (further down the window). You will need to select "Marketing Message" in the "Field #" drop-down menu for the appropriate Message section. Sample Marketing Text: "We appreciate your business."
- Satisfaction Text: Text typed here will display where specified in a Message Section (further down the window). You will need to select "Satisfaction Guarantee" in the "Field #" drop-down menu for the appropriate Message section. Sample Satisfaction Text: "Please contact us if you are not 100% satisfied with your order."
- Substitution Foot Note: Text typed here will display if a SKU substitution occurred. Sample substitution text: "Your order contained items that are currently out of stock. We were able to substitute like items at no cost to you.") - In the Line Items section, edit the default selections as needed.
- In the Line Item Sort field, select how you want items sorted on the packing slip (i.e., by SKU, Location, Pick Position).
- In the Line Item SKU Field, select how you want the SKU to display (i.e., Item SKU, UPC, Vendor SKU, etc.).
NOTES:
--- The column name displayed on the Order Invoice will always be “SKU”.--- If you have created any Custom Fields for Items, these fields will appear in the list of options. If the Custom Field for an ordered Item is empty, the SKU value will appear on the Order Invoice.
- In the Line Item Description Field, select which description (Packing Slip Description, Item Description, Full Description, etc.) should be used as the main description for each line item on the packing slip. This information is pulled from the Item record. Here is a screenshot of an item record showing the three Description fields that contain descriptive text.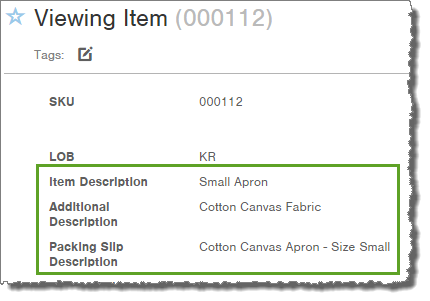
--- If you select Item Description, the "Item Description" from the Item record will appear on the Packing Slip.
--- If you select Full Description, the "Item Description" AND "Additional Description" from the Item record will appear on the Packing Slip.
--- If you select Packing Slip Description, the "Packing Slip Description" from the Item record will appear on the Packing Slip. NOTE: If you select Packing Slip Description and the field is blank in the Item record, the description will default to Item Description.
--- The following options are also available:
- If you select Vendor SKU, the “Vendor SKU” from the Item record will appear on the Packing Slip.
- If you select UPC, the “UPC” from the Item record will appear on the Packing Slip.
- If you select Product ID Tag, the Product ID that was assigned during allocation will appear on the Packing Slip. See Create and Use a Product ID Tag Scheme for more information.- If you have created any Custom Fields for the Item, these fields will also appear in the list of options for use on the Packing Slip.
Optionally, in the additional Line Item Description Fields numbered 2 through 8, select further descriptions that should also appear on the Packing Slip. These descriptions will be provided on separate lines beneath the main Line Item Description Field.
- In the Detail Sections 1-3, Message Sections 1-2, and Operations Section 1, fields are used as follows:
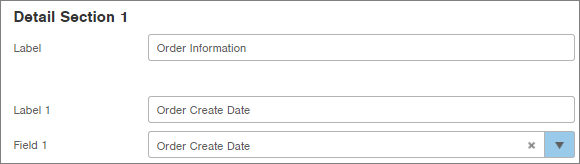
- Label fields display the text you type as a header for the section.
- Label # fields display the text you type as a header for the Field # selected below it. Here is an example. If you type text into the section like this:
The Packing Slip will display the information like this (the layout determines the placement and formatting of the text):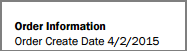
- Field # fields display information from the selected field (i.e., the "Order Create Date" field shown in the above example). -
The Custom Details, Custom Messages, and Customer Service tabs at the bottom of the window provide additional fields for the customized text. Text typed into any of these fields will display wherever the field name is selected in the above sections.
- Here is an example. If you type this information into the Customer Service tab:
- And you select this information in one of the sections:
- The Packing Slip will display the information like this (the layout determines the placement and formatting of the text):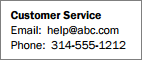
- When you are finished with the template, click Save. The template will be available to create Packing Slips. NOTE: You will be able to add a logo to the Packing Slip Template after saving the template. If you need to edit the template, simply click the Edit button in the Template record.
NOTE: Even though they don't appear on the packing slip template, the order's Bill To and Ship To information will always appear at the top of the generated packing slip. This part of the packing slip is not something that can be customized or disabled at this time.
Add a Logo to a Packing Slip Template
You must first save the Packing Slip Template to add a logo.
- Access the “Packing Slip Template” table. (See instructions above.)
- Click on the Packing Slip Template you want to add a logo to.
- Click the Edit button in the bottom right.
- In the Attach Logo Image area, either drag and drop a logo onto the area or click the icon to select a logo on your computer.
- When you are finished adding a logo, click Save.
Preview a Packing Slip Template
- Access the “Packing Slip Template” table. (See instructions above.)
- Click on the Packing Slip Template you want to preview.
- Click the Actions button and select Preview Packing Slip Template. The Setup step in the preview process appears.
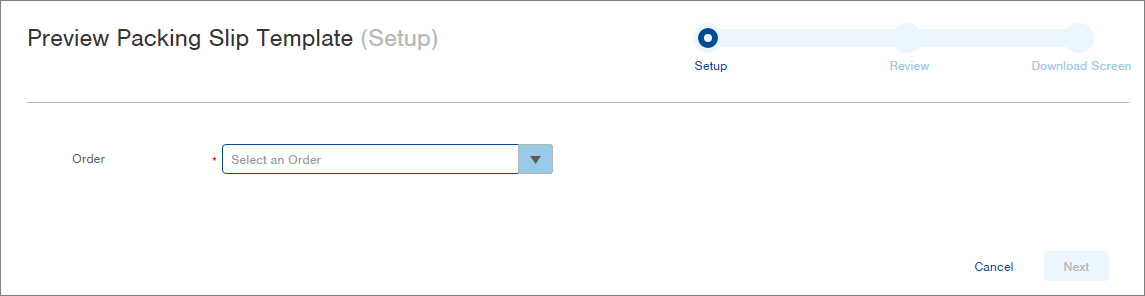
- Select an Order to use for the preview. Only "Processed" and "Shipped" Orders will be available for selection.
NOTE: Click the Search link to search for an order. - Click Next. The Review step in the preview process appears.
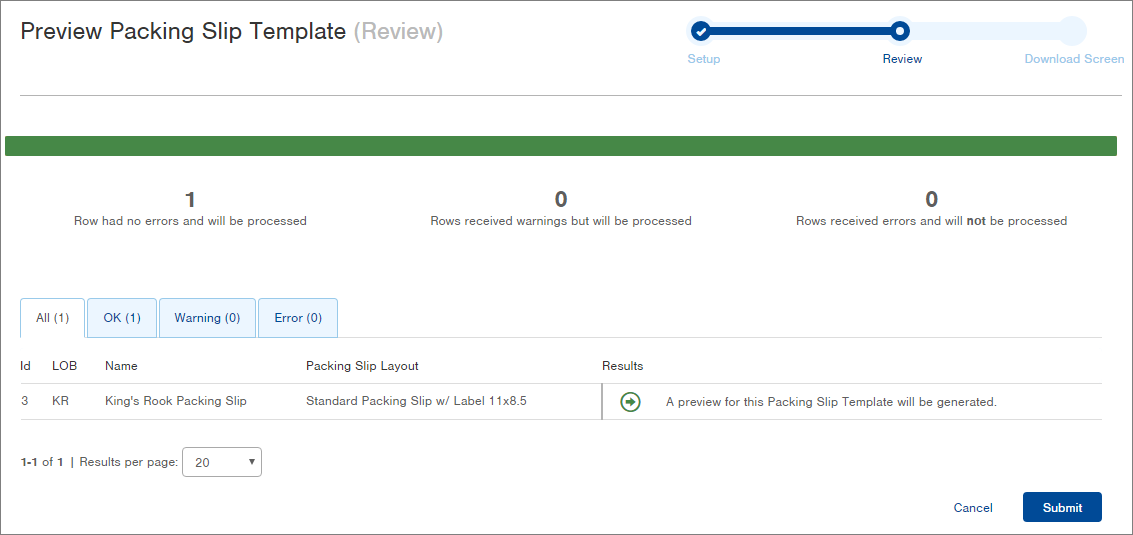
-
Review the Results. If a preview can be generated, a green arrow will display. If a preview cannot be generated, a red X will appear with a detailed message.
-
Click Submit. The Download Screen will appear.
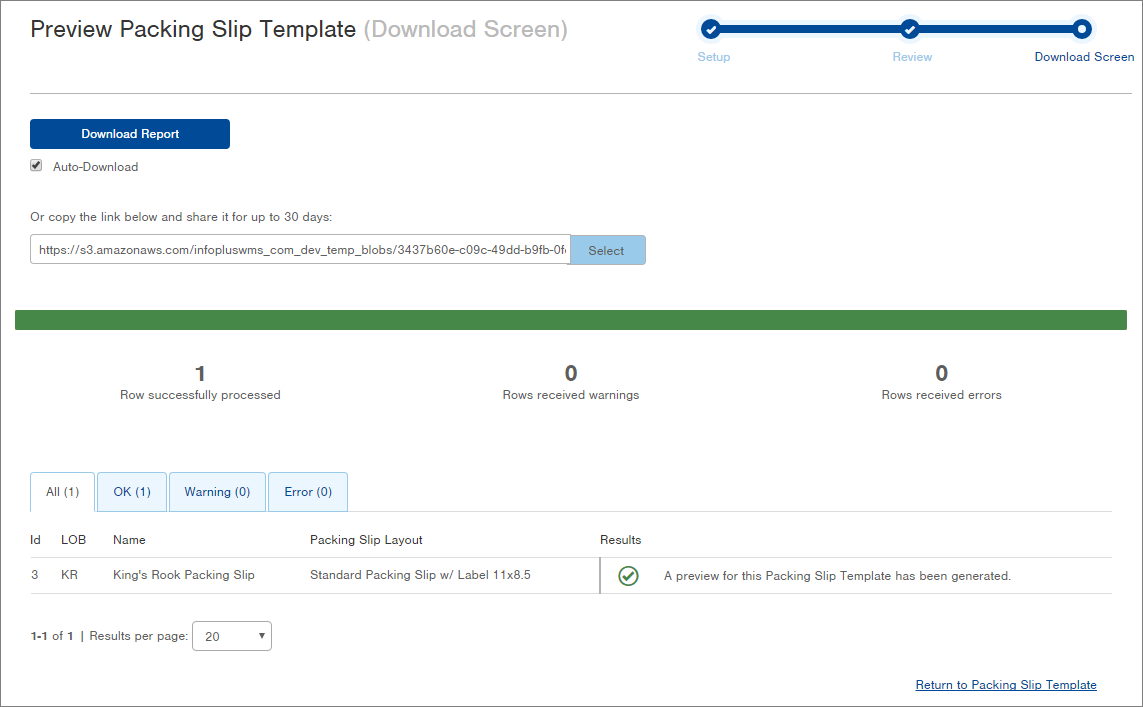
- If the preview was not automatically downloaded to your computer, click the Download Report button. A separate tab will open with the preview.
Duplicate a Packing Slip Template
If the template you want to create is similar to an existing template, use the Duplicate action.
- Access the “Packing Slip Template” table. (See instructions above.)
- Click on the Packing Slip Template you want to duplicate.
- Click the Actions button and select Duplicate. The Duplicate Packing Slip Template screen appears with all fields completed from the original template.
- Modify the template as needed.
- Click Save when finished.
Display Limits for 4x6 and 4x8 Packing Slips
Some fields on the 8.5x11Packing Slip Templates, such as the "Marketing Text" or “Satisfaction Text”, allow up to 255 characters.
However, within the Message Sections of smaller Packing Slip Templates, each individual field may be limited to displaying less than 255 characters. For example, 4x8 packing slips are limited to displaying only 50 characters for each field in the Message Section. This can cause text to appear truncated when generating packing slips.
Solutions:
Here are a few ways to address this issue:
- Shorten the Text: If possible, try condensing your text to fit within the character display limit for your chosen packing slip size.
- Use a Larger Template: Infoplus offers various packing slip template sizes. If a larger size is suitable for your needs, you can switch to a template that allows for more characters to be displayed in each field.
- Create a Custom Smart Document: For ultimate control over layout and display, consider creating a custom Smart Document Template instead of using a standard packing slip template. This allows you to:
- Maintain sizes or utilize custom sizing
- Design the message section layout and width to fit your specific needs
Need Help with a Smart Document?
If creating a custom smart document is your preferred solution, Infoplus offers Professional Services. This team specializes in designing custom templates and can help you create a packing slip that meets your requirements.