An Advanced Shipping Notification (ASN) contains a list of items that have been ordered. (An ASN is sometimes referred to as a Purchase Order)
An Advanced Shipping Notification (ASN) contains a list of items that have been ordered. An ASN has to be created to receive items into the warehouse. (An ASN is sometimes referred to as a Purchase Order.) If the ASN is partially received then Infoplus will fulfill orders using the partially received quantity.
How to Create an Advanced Shipping Notification (ASN)
- Access the ASN Table. Two methods:
- From the Dashboard: Click the “Apps tab, click the “Purchasing” App, then click the “ASN” Table.
- From the Quick Actions shortcut: Press a dot (period) on your keyboard, then select “ASN” from the list of Quick Actions - Click the Create New button. The Creating New ASN window displays.
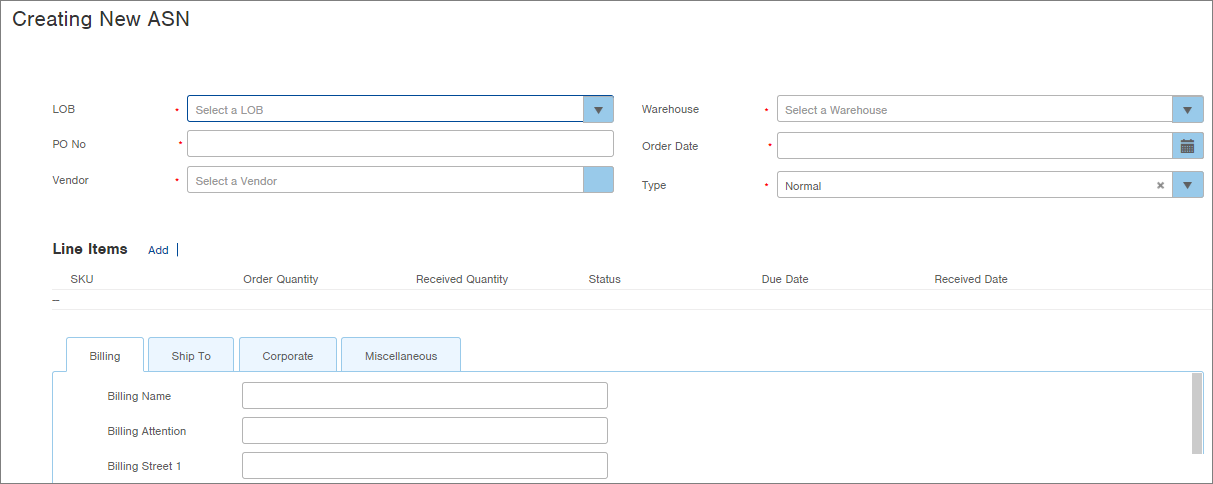
- Select the Line of Business (LOB) for this ASN.
- Enter a number into the PO No field. This should be a unique identifier of this ASN. There is an autogenerate button if you do not have a PO No to create a unique one.
- Select the Vendor from which we are purchasing items. Only vendors for the Line of Business selected will be available in the drop-down menu.
- Select the Warehouse where the items will be delivered.
- Enter an Order Date. (Click the calendar icon to use an interactive calendar.)
- Select the Type of ASN (Job, Kit, Normal, Transfer, or Blind). Note: the only type you should select is Normal, the rest are used for system-generated ASNs.
- Add line items to the ASN by clicking the Add link in the Line Items section of the window. The Add Line Item window displays.
 NOTE: After choosing an item, the Cost and Sell price will populate automatically if a previous receipt for that item has these prices. If there are no previous receipt prices, Infoplus will look for the Sell price on the item record and use that, if possible.
 -
Enter all of the necessary information for the SKU to be added to the ASN and click OK. The SKU will display in the Line Items section of the ASN.
NOTE: After adding the line item, if you need to edit or delete it, click the that appears at the end of the line item.
 - Under Inventory Control, Max Overs % - Max Unders % fields, default to 10%, these values influence how many percent items can be received over or under the ordered quantity.
NOTE: The implications of not setting these fields accordingly will result in receiving less than the ordered quantity and line items being closed without receiving the full ordered quantity. -
Continue to add line items as needed.
-
If you print your ASN or use the RFQ system, enter relevant details into the Billing, Ship To, Corporate and Miscellaneous Tabs at the bottom of the window.
-
When the ASN is complete, click Save. The ASN is saved.
NOTE: The Next Steps section in the top right allows you to create the Receiving Worksheet when these items arrive in the warehouse. See Create Receiving Worksheet for more information.
Edit an Advanced Shipping Notification (ASN)
You will only be able to edit an ASN with a status of "Open.
- Access the "ASN" Table. (See instructions above.)
- Click on the open ASN that you need to edit.
- Click the Edit button in the bottom right.
- Make the necessary edits.
- Click Save.
Delete an Advanced Shipping Notification (ASN)
You will only be able to delete an ASN with a status of "Open.
- Access the "ASN" Table. (See instructions above.)
- Click on the open ASN that you need to delete.
- Click the Actions button and select Delete.
- Click OK through the confirmation.
- Click Save.
