You will need to populate vendors in Infoplus in order to purchase and receive inventory from the vendor using an ASN.
How to Create a Vendor
- Access the “Vendor” table. Two methods:
- From the Dashboard: Click the “Account Management” tab, click the “Purchasing” App, then click the “Vendor” Table.
- From the Quick Actions shortcut: Press a dot (period) on your keyboard, then select “Vendor” from the list of Quick Actions.
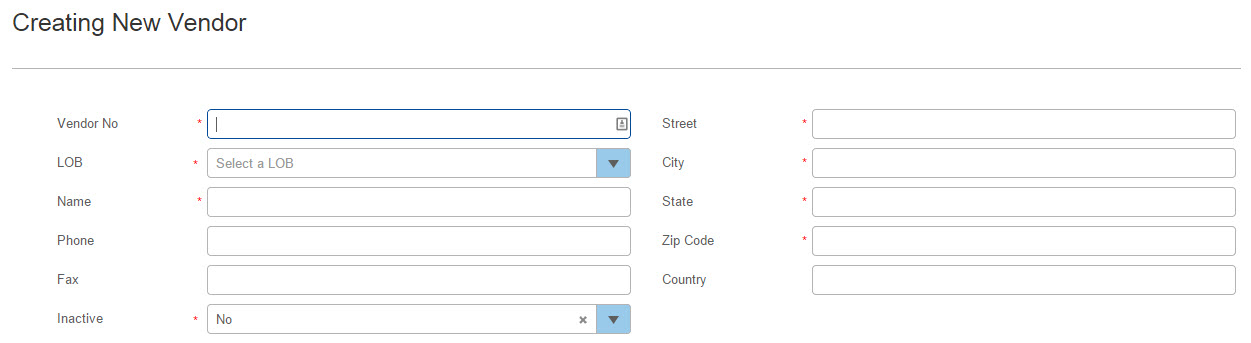
- Click the Create New button in the top right. The "Creating New Vendor" screen appears.
-
Enter a vendor number into the Vendor No field. This is used as the vendor's unique identifier within a Line of Business
-
Continue to enter vendor information. Fields with asterisks are required.
-
When finished, click Save. The Vendor record will be created.
NOTE: The Vendor Name field does not allow punctuation marks. It only accepts alphanumeric characters. If there is a punctuation character in this field, you will get a contact support error when performing actions related to this Vendor.
NOTE: When a purchase order is created referencing this vendor, you can see the PO in the "Purchase Orders" tab within the vendor record.
Edit a Vendor
- Access the “Vendor” table. See instructors above.
- Click on the vendor to be edited.
- Click the Edit button in the lower right.
- Make the necessary edits, and then click Save.
Delete a Vendor
NOTE: You cannot delete a vendor for which a purchase order has been created.
- Access the “Vendor” table. See instructions above.
- Rest your mouse on the record to be deleted.
- Click the double arrows (
 ) that appear at the end of the record. A drop-down menu appears.
 - Click Delete.
- Click OK through the confirmation message.
To perform a bulk load or bulk edit of vendors, see the Bulk Load and Bulk Edit articles.
