Custom Fields allow you to add additional information to a large number of records in Infoplus. These fields can then be sorted and included in Scripts and Triggers for launching functions.
Infoplus allows you to define up to 100 Custom Fields (20 per Field Type) on virtually any table that you can access through the Infoplus application. You can manage the data in these fields when you create and edit records, both individually, and in bulk load or edit. These fields are fully visible when you use Infoplus, when you view records, do searches, and in reports from Infoplus. They are also available through the Infoplus API and to Infoplus Scripts.
Create a Custom Field
- Access the "Custom Field" table. There are two ways:
From the Dashboard: Click the “Apps” tab, click the “Account Setup” App, then click the “Custom Field” Table.
From the Quick Actions shortcut: Press a dot (period) on your keyboard, then select “Custom Field” from the list of Quick Actions. - Click the Create New button in the top right. The "Creating New Custom Field" screen appears.
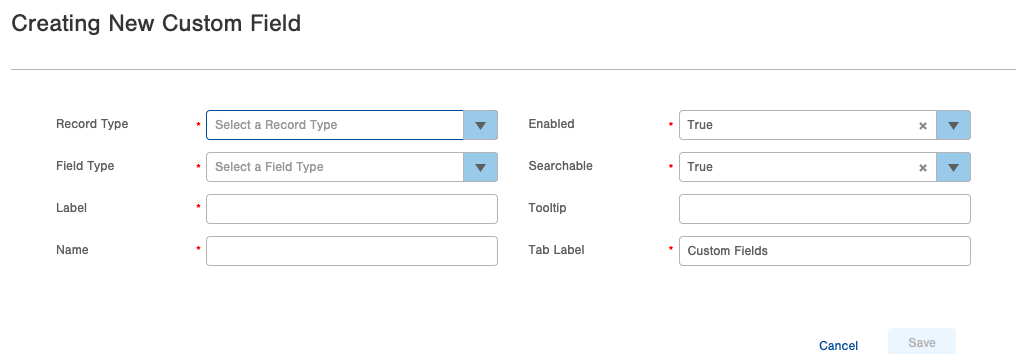
- Supply values in the fields:
- Select the table you want the field to belong to in the Record Type field. For example, you may choose Order, Item, Location, or any other table in Infoplus.
- Select the type of data that the field will store in the Field Type field:
- A Boolean is a True or False value.
- A Date is a Year, Month, and Date.
- A Decimal is a number with up to 12 total digits before the decimal point, and 3 digits after the decimal point.
- An Integer is a positive or negative (or zero) whole number.
- A String is up to 250 alpha-numeric characters.
- Enter the Label that will identify the field for your users in Infoplus. This label appears on the table's search, view, edit, insert, and related screens.
- For consistency with field labels built into Infoplus, it is recommended that you use to start each word with a capital letter, such as "Order Value", "Item Priority", or "Location Max Capacity".
- After you enter a Label, Infoplus will suggest a Name. The field's Name is how the field will be identified in the Infoplus API and Scripts. Unless you are an API or Script user, you are recommended to use the default value suggested by Infoplus.
- Since it is used by programs, there are rules on the format (specifically, it can only contain letters, numbers, and underscores, and may not start with a number).
- Select if you want the field to be Enabled or not. This field is more likely used if you edit a custom field in the future, and want to remove it (as deleting custom fields after they are added is not supported).
- Select if you want the field to be Searchable in the "Quick Search" and "Contains Text" features of Infoplus. Whether this value is True or False, the custom field can be used as a query field.
- Optionally enter a Tooltip to appear on the Create and Edit screens when the field's label is clicked on, to give your users instructions on how to use the field.
- Specify the name of the Tab on the View, Edit, and Create screens that the field will appear under. By default, all custom fields are placed in a tab called "Custom Fields", but you may define your own tabs here (for example, "ERP Fields" or "Values from In-House System"
- When finished enter values, click Save. The Custom Field is saved, and should immediately be visible on the table you selected in the Record Type field.
Edit a Custom Field
- When editing a custom field, you may not change what table (Record Type) or type of data (Field Type) are assigned to the Custom Field. If you need a change in one of these fields, you will need to disable your existing Custom Field, and create a new one with the corrected values.
- When editing a custom field, you can change the Enabled field to False, to remove the custom field from your site. It can always be re-activated at a later time by changing Enabled to True again.
NOTE: Infoplus does not interact with a customer's data. Once a custom field has been created and used, changing the Field Type would cause data integrity issues. To remove/delete a custom field, set the Enabled field to False for the custom field to no longer be visible on the table it is associated with.
