Learn how to set up rate shopping so you can control the cost, speed, and carriers used when shipping out your orders.
As a user, you're able to set up Infoplus to Rate Shop either for one carrier or multiple. This can be done by finding the cheapest or fastest service for the same company (e.g., UPS, FedEx). Follow the steps below to set up and execute rate shopping from the Carrier table as noted below.
What Needs to Be True for Rate Shopping to Work in Infoplus?
- Orders must be Pre-Cartonized for rate shopping to work. You will need to set up cartonization and a trigger to automatically cartonize orders for Rate Shopping to run automatically.
- You will need to set up your Parcel Accounts before Rate Shopping can be set up on the Carrier Table
- You can set up Rate Shopping to run automatically for every order, or you can manually run Rate Shopping on a single order
- Rate shopping is not compatible with Predefined Packages. (Example Predefined Package Types: USPS Flat Rate Envelope, USPS Small Flat Rate Box, FedEx One Rate, etc.). Learn more about cartons on our Create Carton Types article.
- If you want to utilize a script for pre-cartonization or a specific Rate Shopping feature, you will need to set that up before you set up Rate Shopping in the Carrier table
- Rate shopping is not available for orders shipped internationally
- Have a smart filter set up before you set up the Trigger for Rate Shopping. This smart filter should include all the parameters for orders you want to have automatically Rate Shop.
How to Set Up Rate Shopping in Infoplus
There are two methods to access the “Carrier” table:
- From the Dashboard: Click the “Apps” tab, click the “Manifest Setup” App, then click the “Carrier” Table.
- From the Quick Actions shortcut: Press a dot (period) on your keyboard, then select "Carrier” from the list of Quick Actions.
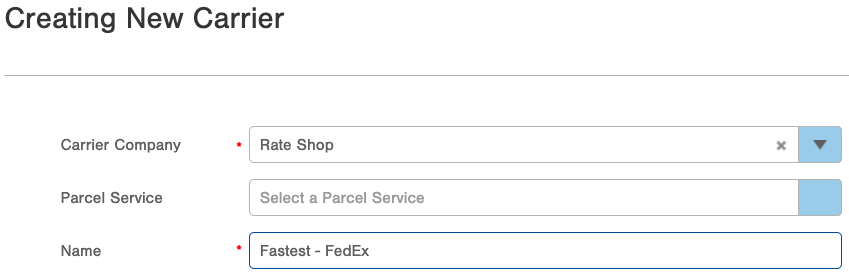
- Click the Create New button. The Creating New Carrier screen appears
- In the Carrier Company field, select Rate Shop from the drop-down arrow
- Enter the Name of your choice (examples below)
- Cheapest - UPS
- Fastest - FedEx
- Cheapest - USPS
- Fastest - DHL
- Under the Rate Shop display section, select your Rule (dropdown arrow):
- Cheapest will select the service that can ship the parcels at the lowest cost out of the options set. Do not include, i.e., UPS 1st day air carriers, with "cheapest rate", '1st Day Air' will never be the cheapest service as 'Ground' will be the cheapest.
- Fastest will select the service that will deliver the parcels the quickest.
- Script allows you to add a script that has been created to customize how rate shopping chooses a carrier service.
- For the Parcel Accounts click Add to list the accounts you would like to rate shop on this service.
- NOTE: Accounts listed are accounts you have already set up on Parcel Accounts table and Carriers table
- Do not include unsupported non-parcel carriers or duplicates.
- For the Carriers, click Add to put the specific carrier services that need to be taken into account for the service.
- Click Save.

Manually Rate Shop Orders
You can choose to automatically Rate Shop any set of orders in your system (you would use a smart filter and a trigger to run rate shopping -- noted how to do this below). But, you can also choose to only run rate shopping manually when you want to use it for specific orders.
Here is how to use Rate Shopping when it is not tied to a trigger:
There are two methods to access the “Rate Shop Orders Process”:
- From the Dashboard: Click the “Apps” tab, click the “Fulfillment” App, then click the “Order” Table.
- From the Quick Actions shortcut: Press a dot (period) on your keyboard, then select the "Rate Shop Orders Process” from the list of Quick Actions.
- Select orders then under the "Actions" menu (top right), select Rate Shop Orders
- Select orders then bottom right, click "Next" to rate shop the selected orders
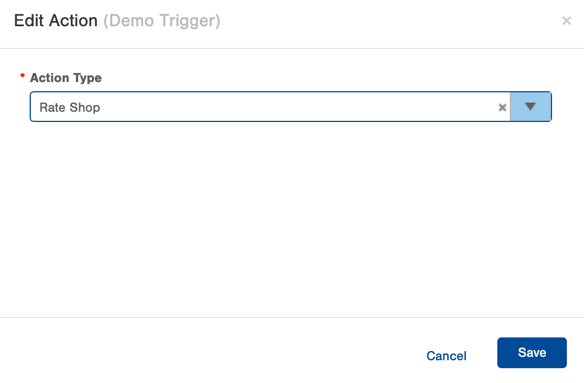
How to Automatically Run Rate Shop via a Trigger Action
A Rate Shop Trigger Action can be used to have orders automatically rate shopped upon insert into Infoplus or if they are updated. If a rate shop action is assigned to a trigger, then any orders matching the trigger's filter will automatically be rate shopped. For insert actions, this relies on the order being set to one of the Rate Shop Carriers that have been created.
NOTE: When you create an order, the carrier for that order needs to be the Rate Shop Carrier (created above) for Rate Shop to run for that order.
If the carrier is not set to Rate Shop, or if any other error occurs during the automatic Rate Shop process, you will receive an alert (on the alert table) with information about the error.
To learn more about how to set up triggers, click here.
Pre Cartonization Trigger Action
In order for Rate Shopping to work, you will need to set up your orders ahead of time to Pre-Cartonize. This way the system will know the size, weight, and dimensions of the shipment so it can calculate and find the best price/speed for your orders.
Learn how to set up a trigger action and a script to automatically Pre-Cartonize orders. Make sure this step is complete before setting up your Rate Shop Carrier.