You can customize some aspects of the Fulfillment Process when you select 'Run Fulfillment' from the Orders Table.
The "Run Fulfillment" process in Infoplus provides a streamlined way to allocate, pick, pack and prepare your orders to ship.
- Which orders? You can fulfill just your selected orders, or fulfill orders based on an Order Filter (a predefined set of order criteria). See Create/Manage Filters for more information.
- Which fulfillment selections? You can fulfill based on a Fulfillment Plan (predefined set of fulfillment selections), start with a blank slate, or perform just allocation (bypassing Pick, Pack, Ship processes).
NOTE: When using a Fulfillment Plan, you will be able to bypass steps 8-31 below because those selections are predefined in the plan. And note that for further efficiency, you can schedule a Fulfillment Plan to run automatically on specific days and times. See Create Scheduled Plans for more information.
Run Fulfillment
-
If you are selecting the orders to be fulfilled from the Orders Table (as opposed to using an Order filter), begin at Step 2.
If you are selecting orders to be fulfilled using an Order Filter (which would need to already be created), press the dot (.) on your keyboard and select "Run Fulfillment" from the list of Quick Actions. Then jump to Step 5. See Create/Manage Filters for more information on creating filters.
- Access the “Order” table. Two ways
From the Dashboard: Click the “Account Management” tab, click the “Order” App, then click the “Order” Table.
From the Quick Actions shortcut: Press a dot (period) on your keyboard, then select “Order” from the list of Quick Actions. - Click the checkbox next to each order you want to fulfill. (You can only fulfill orders in a status of "On Order".)
NOTE: To select all records that are displayed (i.e., after performing a search to display only orders to be fulfilled) click the checkbox in the upper left corner. Only the records on the current page will be selected, but a link at the top of the window allows you to select all records. - Click the Actions button and select Run Fulfillment. The "Fulfillment Type" step in the process will appear.
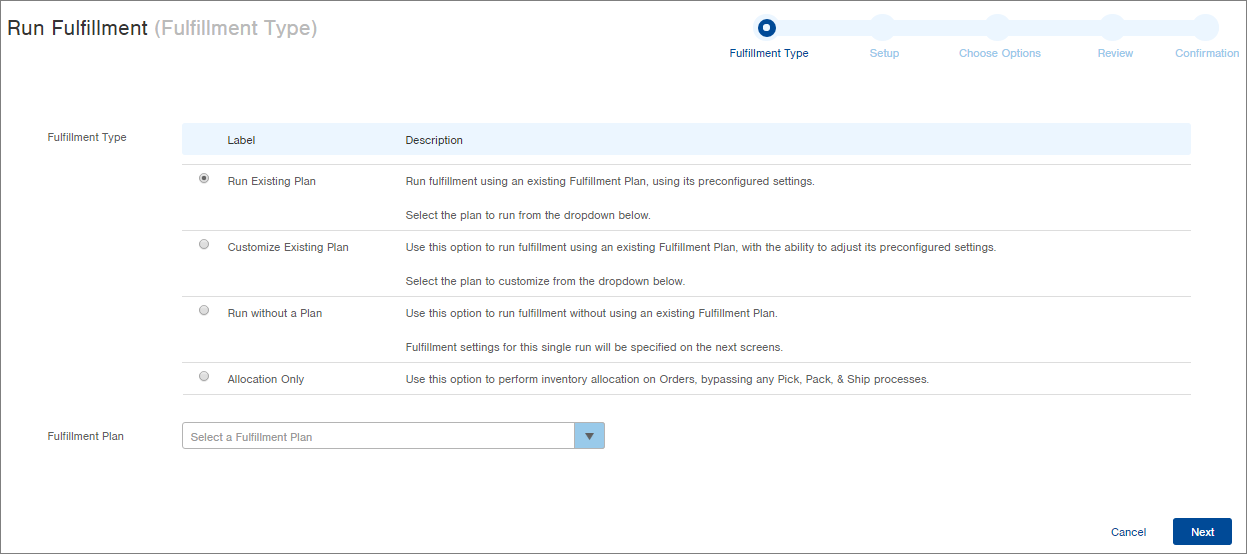
- Select the Fulfillment Type:
- "Run Existing Plan" uses an existing Fulfillment Plan without the ability to customize selections
- "Customize Existing Plan" uses an existing Fulfillment Plan with the ability to customize selections
- "Run without a Plan" begins fulfillment with a blank slate for you to make the necessary selections
- "Allocation Only" performs the allocation portion of fulfillment only, bypassing pick, pack, ship options - If you selected "Run Existing Plan" or "Customize Existing Plan", select the Fulfillment Plan from the drop-down menu at the bottom of the window. If you did not select either of those options, continue to the next step.
- Click Next.
- If you selected "Run Existing Plan", you will bypass the Setup screen (as the selections have already been made in the plan) and the Choose Options screen will appear. Go to Step 32. NOTE: If you selected Orders and then accessed the Run Fulfillment process, those order selections will override the Order Filter in the Fulfillment Plan you select.
- If you selected "Customize Existing Plan", the Setup screen will appear with all selections filled in from the plan that you can edit as needed. Continue to the next step.
- If you selected "Run without a Plan", the Setup screen will appear with all blank fields for you to complete as needed. Continue to the next step.
- If you selected "Allocation Only" the Setup screen will appear with only the Allocation fields displayed. Continue to the next step.
Here is a screenshot of the Setup screen showing the first three sections (with blank fields):
NOTE: If you select "Allocation Only" in the previous step, only the Allocation Options will appear.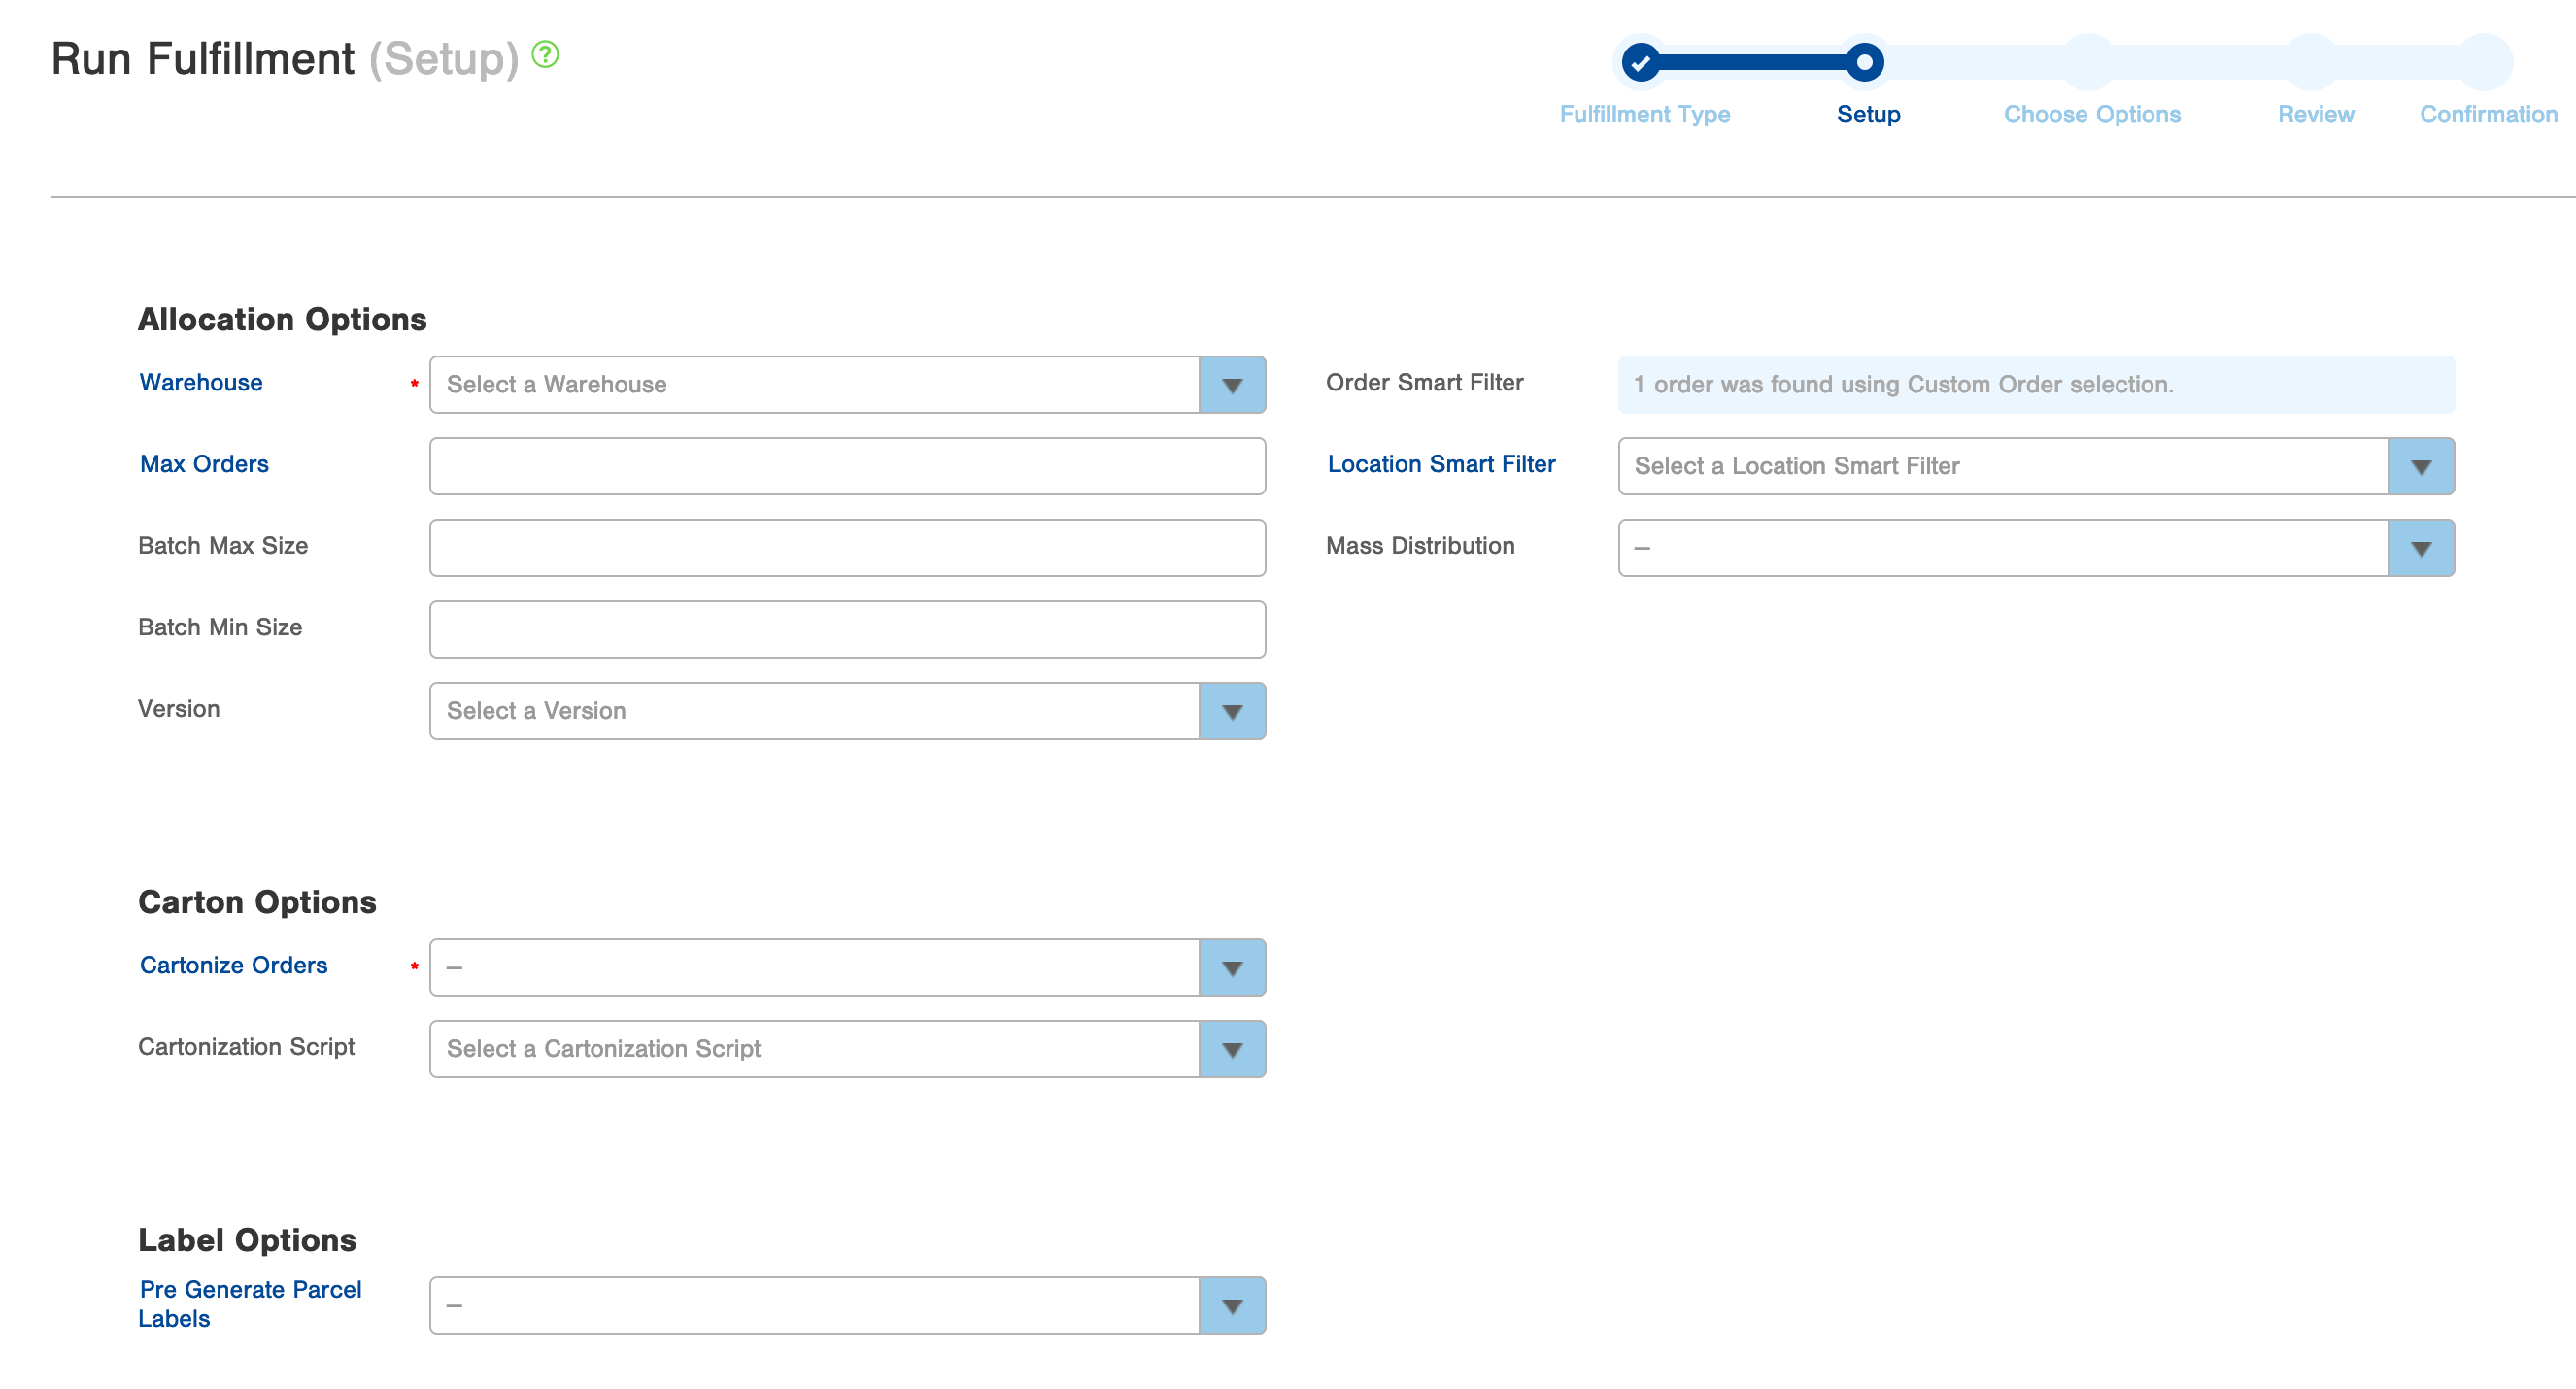
Allocation Options
-
Select the Warehouse containing the orders to be fulfilled.
-
If you selected orders when you begin the fulfillment process, the Order Filter field will be unavailable and will indicate how many orders were selected (shown in screenshot above).
If you began the fulfillment process from the process itself (and not from the Orders table) that means you have an Order Filter created that indicates which orders are to be fulfilled. Select the Order Filter here.
NOTE: If the Order Filter contains orders that do not match the selected warehouse, those orders will not be fulfilled. Additionally, if you selected "Run Existing Plan" as the Fulfillment Type at the start of this process, any orders you selected prior to running this process will override the Order Filter in the Fulfillment Plan you selected. -
If applicable, enter a Maximum Number of Orders (i.e., if the availability of your warehouse's employees and/or space limits the number of orders to be fulfilled to 25). As well as the Batch Max Size and Batch Min Size.
-
Select which Version you want to use. (we recommend always use version Beta unless instructed otherwise from our Support or Implementation teams).
-
If applicable, select a Location Filter (i.e., if you only want to fulfill orders in a particular zone, you would need to have created a filter in the "Location" table to only show that zone's locations; and you could select it here.)
-
If applicable, select Mass Distribution to be either True or False (See this wiki around Mass Distribution).
-
If you selected the "Allocation Only" option on the previous screen, you will have no more fields to complete. Click Next and continue to Step 32.
If you selected any of the other Fulfillment Type options on the previous screen, continue to the next step.Carton Options
-
Select True or False in the Cartonize Orders field. Selecting True tells the system to calculate how many cartons to use for each order, which carton types to use, and which items to put into each carton. Optionally, if you have a Cartonization Script you can select it here.
NOTE: These are the requirements to work:
- Items need to have Footprints (Length/Width/Height). These dimensions get entered into the Item record. See Add Dimensions to Items for more information.
- The Line of Business (LOB) for the warehouse needs to have Carton Types defined. See Create Carton Types for more information. -
If you have any scripts set up for Cartonization, you can add them in the Cartonization scripts field.
Label Options
-
Select True or False in the Pre-Generate Parcel Labels field. Selecting True will create shipping labels for each carton when this fulfillment process runs.
NOTE: This requires orders to be cartonized (selecting True in the previous step).
For the remaining fields, here is a screenshot showing further down in the Setup step of the Fulfillment Process:
Picking Options - Create Pick Work
-
Select True or False in the Create Pick Work field. Selecting True will create Work Tickets for the Picks necessary to fulfill the orders. If you select True in the Create Pick Work field, other fields within this section become available, and many are required (asterisks will appear). Continue to the next step. If you select False, other fields in this section will default to False and you can move on to the next section. Continue to 26.
-
Select a Picking Rule (required if you selected True in the "Create Pick Work" field). The Picking Rule specifies how items will be picked from a location.
- The "Simple Wave" Picking Rule indicates that items will be picked in bulk for your orders using a wave pick and will follow typical pick/pack operations from there.
- The "Simple Wave with Casebreak" rule indicates that "Casebreak"-enabled items will be picked as cases using a wave pick, and will be labeled at the point of picking and sent straight to Shipping, bypassing typical pick/pack operations. (Pick work tickets for Casebreak-enabled items will include the parcel labels so labels can be placed on cartons at the point of picking.) "Regular" items (not casebreak-enabled) will be picked using the "Simple Wave" rule.
- The "Pick to Cart" Picking Rule is used when picking items and placing them directly onto a mobile cart. See the Use Pick to Cart Fulfillment Options for more information.
- The "Single SKU Optimization" Picking Rule indicates that you will be picking items for orders containing only one line item or SKU (in whatever quantity). This rule combines pick work documents and their related warehouse documents into one PDF (e.g., pick ticket, packing slip, order invoice, Order Assembly Guide) for more efficient fulfillment of these orders. -
Select a Pick Sort Rule (required if you selected True in the "Create Pick Work" field). The Pick Sort Rule specifies whether to pick by Location or SKU. This information will be reflected on the Work Ticket.
-
Select a Location Sort (required if you're using a Pick Sort Rule of "Location"). The Location Sort defines the order in which work tickets are sorted. By default, if using a Pick Sort Rule of Location, locations are sorted by location addresses. Alternatively, custom location sorts can be applied to sort locations however you choose. Please contact Infoplus Support for assistance with setting up a custom Location Sort.
-
Select a Layout Rule (required if you selected True in the "Create Pick Work" field). The Layout Rule specifies how items will be laid out (once they are picked). Select to stage the items for all orders by SKU (Layout by SKU) or pack one order at a time (Layout by Order).
-
Select a Pick Scan Scheme (required if you selected True in the "Create Pick Work" field). The Pick Scan Scheme indicates the scanning requirements for picking items. You can require scanning the Item's barcode, or the Item's location, neither, or both. Unless you have edited it, the "Default" scheme requires the Location be scanned when picking, but not the Item. See Create a Pick Scan Scheme for more information.
Picking Options - Create Pick List
-
Select True or False in the Create Pick List field. Selecting True will create a Pick List report (a list of all pick work) for this fulfillment process. Other fields within this section become available and required (asterisks will appear). Continue to the next step. If you select False, move on to the Create Pick Summary field or Document Options section.
-
Select a Pick List Format (required if you selected True in the "Create Pick List" field). The Normal format displays a landscape document with barcodes. The Condensed format displays a portrait document without barcodes and less padding between rows.
-
Select a Pick List Layout (required if you selected True in the "Create Pick List" field). The Pick List Layout specifies how to organize the list of locations on the report.
- An Order layout displays pick work and its related Orders beneath each Work ID and barcode. (See Sample Reports for an example.)
- A SKU layout displays pick work for each SKU, including the Work ID and barcode for each SKU. (See Sample Records for an example.) -
Select a Pick List Group (required if you selected True in the "Create Pick List" field). The Pick List Group specifies how to group pick work (i.e., by the location's Behavior Type, Building, Level, Line of Business, Pick Code, or Zone).
-
Select a Pick List Sort (required if you selected True in the "Create Pick List" field). The Pick List Sort specifies to sort pick work on the report by Location or SKU.
-
Select a Pick List Location Sort (required if you're using a Pick List Sort of "Location"). By default, if using a Pick List Sort of Location, locations are sorted by location addresses. Alternatively, custom location sorts can be applied to sort locations however you choose. Please contact Infoplus Support for assistance with setting up a custom Pick List Location Sort.
Picking Options - Create Pick Summary
-
Select True or False in the Create Pick Summary field. Selecting True will create a Pick Summary report (summary of all pick work) for this fulfillment process. Other fields within this section will become available and required (asterisks will appear). Continue to the next step. If you select False, move on to the Document Options section.
-
Select a Pick Summary Layout (required if you selected True in the "Create Pick Summary" field). The Pick Summary Layout specifies how to organize the data on the report.
- An Order layout displays a summary of pick work by Order, showing the picks under each Order. (See Sample Records for an example.)- A SKU layout displays pick work for each SKU without Work IDs which are included in the Pick List Report. (See Sample Records for an example.)
-
Select a Pick Summary Sort (required if you selected True in the "Create Pick Summary" field). Select to sort the summary by SKU Position.
Shipping Options
-
Select True or False in the Send to External Shipping System field. Selecting True indicates that Infoplus should send all orders that are part of this Fulfillment to an external shipping system (which you select in the next field). For example, if you use ShipStation to ship orders that you place in Infoplus, select True to automatically send the processed orders to ShipStation for shipping. See the Overview of External Shipping Systems for more information.
-
If you selected True in the Send to External Shipping System field, select the External Shipping System that you want Infoplus to communicate with (e.g., ShipStation).
-
Select True or False in the Auto Ship Casebreak Cartons field (this is a required field if you selected "Simple Wave with Casebreak" as the Picking Rule above).
- Selecting True tells Infoplus that for orders containing ALL casebreak-enabled items, automatically indicate that the cartons have shipped once this fulfillment process runs (the Order status will show “Shipped”). If an order in this fulfillment process contains SOME casebreak-enabled items and some “regular” items (not casebreak-enabled), the Order status will not show “Shipped” until the regular cartons in the order have Shipped (using the Shipping Station Mobile Floor App or the Ship Parcel Order Desktop App).
- If selecting False, Orders in this fulfillment process will not be marked as “Shipped” until the packages are shipped (using the Shipping Station Mobile Floor App or the Ship Parcel Order Desktop App). NOTE: Casebreak cartons can still be labeled at the point of picking and sent to the Shipping area, but the order will not show "Shipped" until all cartons in the order go through the Shipping process in Infoplus. -
You are able to have the Order Auto Shipped after you run fulfillment on it. Select True if you would like this to be active.
Document Options
-
In the Document Options section, select True or False in the Create Packing Slip field. Selecting True will create the Packing Slip for each order being fulfilled. (See Sample Packing Slip.)
-
The Override Packing Slip Template field lets you override the template that is assigned to each individual order being fulfilled, if a template has been assigned. If you leave this blank, you are indicating that each Order already has a Packing Slip Template assigned. With this field blank, if there is no packing slip template assigned to a selected order, the fulfillment process will not be able to complete.
-
In the Create Order Invoice field, select True or False. Selecting True will create the Order Invoice for each order being fulfilled.
-
The Override Order Invoice Template field lets you override the template that is assigned to each individual order being fulfilled, if a template has been assigned. If you leave this blank, you are indicating that each Order already has an Order Invoice Template assigned. With this field blank, if there is no order invoice template assigned to a selected order, the fulfillment process will not be able to complete.
-
In the Create Order Assembly Guide field, select True or False (leaving the field blank equals False). Selecting True will create the Order Assembly Guide (OAG) for each order. The OAG is used by warehouse personnel to assist with assembling the order. See Sample OAG.)
-
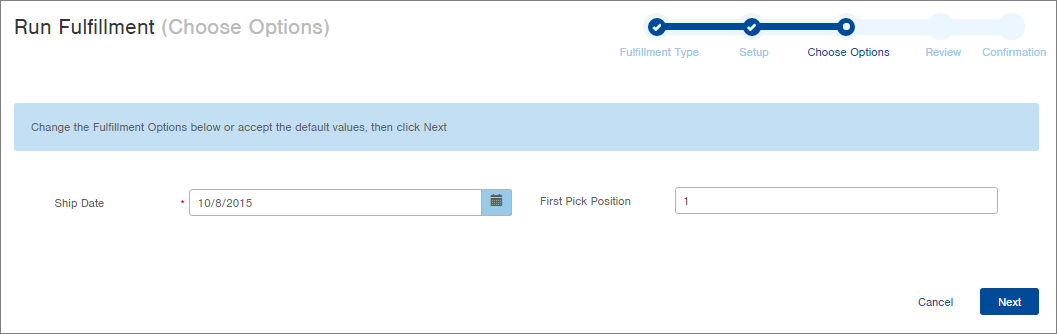
After all necessary fields have been completed on this Setup screen, click Next. The Choose Options step in the process appears.
-
In the Choose Options window, if necessary, change the Ship Date, which defaults to today's date.
-
If necessary, change the First Pick Position, which defaults to one. This is the starting position for picking which typically begins at position 1 but can be changed as needed.
-
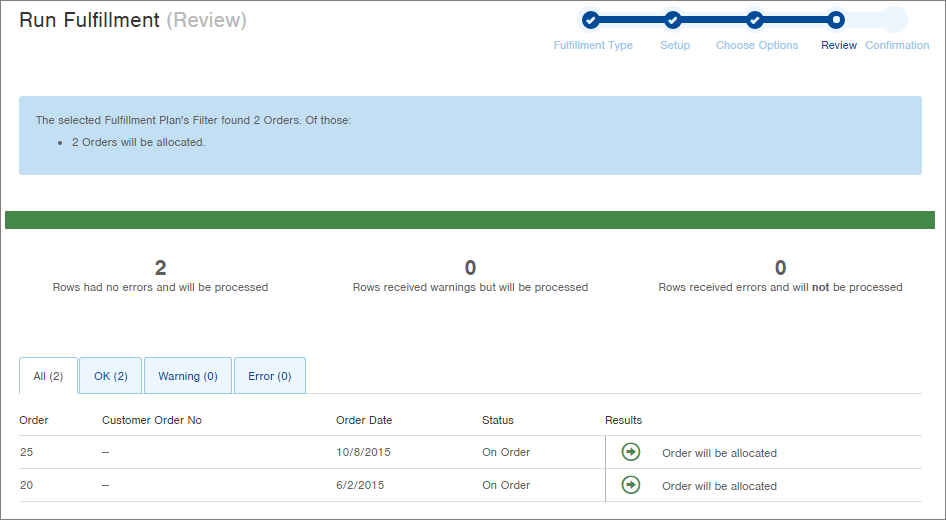
Click Next. Infoplus will review allocation requirements for the selected orders (i.e., confirming available inventory). The Review step in the process will appear.
-
Review the planned allocation results.
-
To continue in the process, click Submit. Infoplus will allocate inventory where there were no errors (from the previous screen). The status of successfully allocated orders will now be "Processed." Infoplus will attempt to run the Pick, Pack, Ship steps on the allocated orders (unless "Allocation Only" was the selected Fulfillment Type at the start of the process). The Confirmation step in the process appears.
-
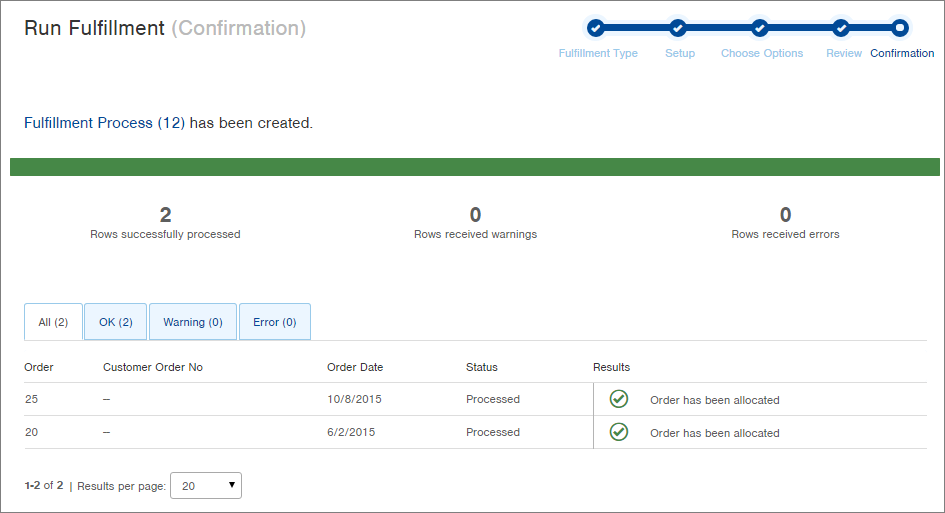
Review the final results. The Results table will indicate if any errors were detected during allocation or the pick, pack, ship processes.
NOTE: If ANY error on ANY order occurred during the Pick, Pack, Ship processes, NO orders will be eligible for pick, pack, and ship. However, orders will be moved to the Processed status, and inventory allocation to the orders will still have occurred. You will be able to use the Run Pick Pack Ship action on this Fulfillment Process after fixing any errors.
-
To review the fulfillment process just completed, click the Fulfillment Process link at the top of the window. From the Fulfillment Process record, you can view any errors that occurred, as well as view and print associated documents (i.e., Packing Slips, Pick List Reports, Pick Summary Reports, Pick Work Tickets, etc.), and link to related records. See View a Fulfillment Process for more information.
Here is an example of errors in a fulfillment process that happened during Pick, Pack, Ship: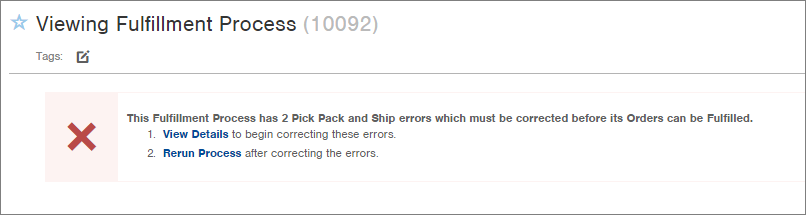
From this screen, you can View Details to see details about the error(s), or Rerun the Process after the errors have been corrected, to try again. See View Fulfillment Process Errors for more information. -
After completing fulfillment, and when you're ready, Ship the Parcel Order using the Shipping Station Mobile Floor App or the Ship Parcel Order Desktop App


